 |
Table of Contents |
|
|
Hello viewer. My name is jjoxuu and I main bot lane at diamond level in EU West server. I like playing ADC the most but I'm not a bad support either. I sort of started League of Legends in Season 1 but I quickly stopped playing. I got really into the game around Season 2 where I also started playing ranked as top laner. I ended up gold 1 during that season.
For the next season I decided to start playing bot lane and that's what I did. I ended up in platinum 1 during that season. In the current season I'm still maining bot lane and I'm currently in diamond. I'm more into teamrankeds at the moment but I've set this season's goal to high diamond.
||
I am and have been in several teams but I chose to represent this one because not only it is the highest but it is soloely based on lane swap strategy. Average skill of the team is ~Diamond IV and we got to Gold 1 after acing the placements. We were stuck for a while in there due facing even full challenger teams and they obviously had better game mechanics.
We decided we needed a strategy to survive laning phase and lane swap was the "thing". By doing this, soloQ skill didn't matter that much in lane anymore but the teamplay between teams. We quickly wrapped up wins making it to platinum V where we skipped into Platinum III and we are currently in Platinum II.

Proof of success
So what exactly is lane swapping ? Lane swapping means you change lanes between solo lane and duo lane, in other words, bot lane and top. This is the most efficient lane swap because mid lanes often are ranged and have great wave clear whereas top laners do not.
You must know the reasoning for lane swapping however. There are certain conditions that should apply more or less to do the lane swap. There is no point in doing it if you or your team has no idea why you are doing it. I don't recommend doing too many lane swaps in soloQ since it requires team communication. Anyways, here are few reasons/conditions for lane swap.
|
|
spppppp
|
Deny top laner
Let's say you are in champ selection. You notice they have picks like Nami, Wukong and Yasuo. Their team compo obviously relies on Yasuo having good game to deal tons of damage with ultimate. With lane swap, you can give Yasuo really hard time. It's worth to deny hyper carry champions or team comp based champion with lane swap. |
|
|
sp
|
Avoid unfavored lane
This is propably the most common reason one would lane swap. Someone is always picking top or mid earlier than other so enemy team can counter other lane. It wouldn't be wise to put Renekton against Ryze for example. Ryze is more or less hyper carry champion that does really well against tanks like Renekton.
|
|
|
spppppp
|
Gain control of objectives
This is the hardest one to execute and you shouldn't lane swap based on this reason alone. Basically the idea of gaining control of objectives means having clear idea how you want the game to go. For example; You want to get early top tower and rotate for early dragon after to help every lane to do well. Then just lane swap back to normal lanes. |
|
|
sp
|
Have strong AD carry farmed
This basically means your team is based on protecting the AD carry that can do tons of damage. Hyper carries such as Kog'Maw and Vayne are in disadvantage at lane so you want to guarantee free farm in top lane. Vayne can win lane at 6 so you want to farm at least until that point and Kog'Maw is just no brainer after gaining few items so you want safe gold.
|
First of all, you want to be clear that you want to have a lane swap during the champion selection. You want to have your top laner run
Teleport because top laner won't need offensive summoner due being pushed to tower most of the time. Then after the game start you have top laner go bottom and bottom lane top
without revealing themselves so the enemy team doesn't counter-swap the lanes.
General objective is to push the minions against the top tower as fast as possible to get damage on the tower. You want to have the top tower destroyed at least faster than enemy bot lane. After the tower is gone, you rotate back to bot lane and your top laner goes top. This gives you global gold advantage which should be used to win the lanes after. More in-depth strategies further in the guide.
|
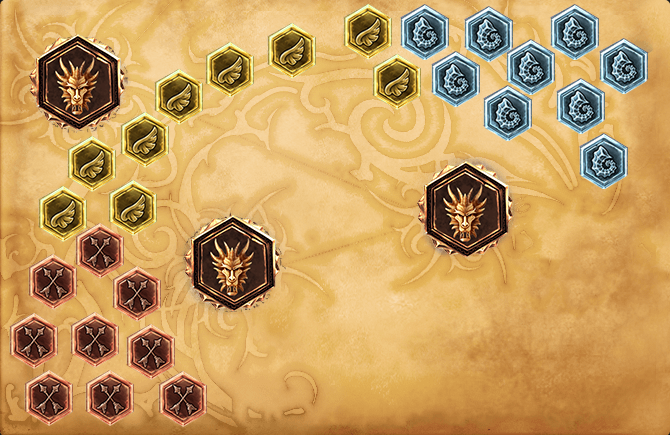
First you want to have your buffs warded for invades. You want to be extremely cautious due you are having bot lane top. Red dots are the positions your lanes should take to not get spotted.
Stealth Wards show the position for possible wards to cover your buffs. If invades happen, immediatly have your jungler go to the opposing buff in enemy jungle.
The red arrow on the map indicates where you should enter the lane from top. You usually have support with CC so you go to the bush and enter the lane after you see enemy top laner coming to the minions. This way you will ambush him from behind and you should at least get a summoner out but more likely a first blood if support lands the CC. Your jungler can do the buddy system in the jungle with top laner (current bot laner) meaning you share xp of buff + few camps and then use
Teleport back to lane. More further in the guide.
Invisible text!
|
|
GOD TIER |
|
GOOD TIER |
|
OK TIER
|
Invisible text! Invisible text!
Invisible text!
|
|
GOD TIER |
|
GOOD TIER |
|
OK TIER
|
Invisible text! Invisible text!
Invisible text! Invisible text!
Invisible text!
|
|
SP GOD TIER |
|
GOOD TIER |
|
OK TIER
|
Invisible text! Invisible text!
Invisible text!
|
|
GOD TIER |
|
GOOD TIER |
|
OK TIER
|
So let's have a breakdown of the champions and their placements. I'll go over them seperately or grouped depending if they have unique gameplay. This will only cover the champions but check lanes chapter for each lanes individual lane's strong points.
|
|
|
SPE |
>> Jinx is a god of lane swap. The best champion for it due the massive attack speed scale allowing to take towers down fast, having CC lockdown and long ranged poke. Level 6 she also has execute ability. Overall the best champion and ADC for 2v1 lane.
|
|
|
|
SPE |
>> Corki and Lucian don't have any scalings but they both have good wave clear and escape meaning they can push quite freely. They both also have good execution if top laner is hit by CC. It's propably smarter to kill top laner with jungler than go directly for tower.
|
|
|
|
SPE |
>> Kog'Maw is not great at pushing tower or killing the top laner but he scales really well into late game and doesn't really stand a chance against most of the bot lane match-ups so in order to have really good late-game, you lane swap (him?) to top lane for free farm mostly.
|
|
|
|
SPE |
>> Thresh and Morgana both give ADC escape tool, have CC to trap enemy top laner and they both allow free dive for the kill in 3v1. I could argue that both have poke, even Thresh. They don't only excel in lane swap but in team fights too.
|
|
|
|
SPE |
>> Nami and Karma both give mobility and lockdown for a dive. The difference between each other is that Karma focuses more on the poke whereas Nami on sustain and giving ADC the poke. Nami is a riskier pick as you don't benefit from the sustain as much. You need the dive as it's really easy and you can continue the push against second tower with the sustain or rotate for dragon.
|
|
|
|
SPE |
>> Leona and Braum both don't provide much when considering poke or sustain but they sure can fight under tower. You completly rely on getting a kill or forcing enemy top laner to recall. In team fights however, these two will do just as fine as other picks.
|
|
|
|
SPE |
>> Nunu & Willump is the god of lane swap considering jungle. He really just needs a golem item nothing else. Propably one of the only support tanks that still sees competitive play (in Korea at least). You should only take buffs and level 3 then only be with the ADC. Nunu & Willump can push towers, get objectives and tower dive like a boss and then eat a minion for full hp again.
|
|
|
|
SPE |
>> Elise and Lee Sin are the mobile junglers of the jungle. Both applying quite good pressure and allow fast dragon fights. Elise is better tower diver due she can change tower aggro at will with Rappel but Lee Sin deals more damage and can also escape tower aggro quite easily. Both need to apply early pressure. I can shortly mention Vi and Jarvan IV here, both being strong junglers and can dive quite easily.
|
|
|
|
SPE |
>> Shyvana and Renekton both have really good wave clear and canno't be dived that easily. Both also just need to be as tanky as possible for mid game rumbles. Shyvana scales better than Renekton and this crocodile is more of a lane bully anyways so one could argue about Renekton being good for lane swap. However: You won't be laning too much after you switch lanes around. You just need to be front line for ADC. More about team fighting as top laner in lanes section.
|
|
|
|
SPE |
>> Lulu is really good in lane swap due great wave clears and you can't really shutdown her by denying cs. Lulu scales well with levels and has great amount of mobility + CC in team fights. She is always useful in team fights no matter what. Only danger is getting towerdived early due being squishy but by using abilities correctly, it's all fine. I'll add Shen here too with addition that Shen can't get towerdived and it requires one good taunt early on to get tower aggro on enemy bot lane.
|
|
|
|
SPE |
>> Karthus and Ziggs are both really good in the mid lane but also REALLY good for lane swapping. You want to have great amount of wave clear and poke in order to have pressure when pushing for towers. Not only that but both have global presence with ultimates. Especially Karthus ultimate will help a tons.
|
|
|
|
SPE |
>> Twisted Fate functions in the same way as Karthus and Ziggs. He has great amount of wave clear and poke when pressuring under tower but his ultimate works differently. Twisted Fate also brings global presence but the problem is when using it. Mid lane is left wide open when the ultimate is casted for other lane. You need to really think carefully: "Can we take X objective without losing too much in mid lane".
|
|
|
|
SPE |
>> I already went trough with the Lulu a bit so I'll skip it and go to LeBlanc. LeBlanc also has decent amount of wave clear but functions differently as she doesn't have global pressure and is more of a all-in champion rather than poke. You want to have LeBlanc bursting someone before or while pushing for objectives so that the enemy champion dies or is unable to join the fight.
|
|
|
|
SPE |
>> Orianna is decent good in lane swap due great wave clears and you can simply zone enemies with the ball because Command: Shockwave is really good ultimate, one does not simply want to get hit by it. Just normal mid lane until your team begins to group. You must have good ball positioning in order to take the best out of the champion when sieging towers.
|
This is propably the most important chapter where I go trough each lanes individual goal in order to make a succesful lane swap. It's not required to complete each objective to win the game but obviously the more objectives you have done, the easier the team fights will be. You can use common sense to order objectives in "list-of-priority". After going trough each lane seperately, I'll make sort of tl;dr list of objectives for the team as a whole.
NOTE: Top lane means AD carry & support
Few exceptions
First one is if your top lane duo manages to kill or force enemy top laner back and can guarantee a tower kill during the next push, it's OK for top lane to go defend bot lane in stead of heading top lane.
Second one is if you get top tower down fast and the enemy top laner is overstaying in the lane with low hp, it's better to go damage the second top tower if you are healthy enough to do so. I've had situations where we have even taken it but just keep it within limits because you don't want to die and you risk
dragon by doing this. It also gives enemy top lane advantage.
The end I guess. I didn't come up with anything else to write about. If you have any questions, feel free to ask. I'm also willing to improve and add content to the guide if you think something is missing. This is updated to the current patch 4.12 and I'll try to keep it updated if anything changes.
|
Hello. My name is Joxuu and I am a diamond level jungler. I started playing actively in Season 2 and I've been playing actively ever since. I've played bot lane the most but not too long ago, I decided to take up the role of jungler.
This guide will be for jungle
Gragas whom I have played ever since the season started. I haven't played hundreds of games with him yet but I can already tell that he will be one of my best junglers. I basically carried myself to diamond by spamming
Gragas in soloQ because he is in a really strong position at the moment. I will try to help you understand the champion and his game mechanics in this guide.
|
|
Lulu has very low base movement speed (25) & is very squishy as the result of her being a ranged champion. Lulu has a high skill cap, meaning she is a hard champ to master. People also have tremendously high expectations of Lulu players, as you need to be able to make clutch plays. |
|
-Only 325 MS, which is low.
-She is a squishy caster.
-Has a high skill cap.
-She is hard to master.
-Others have high expectations.
|
|
|
|
OK against
|
|
|
|
|
|
|
|
|
|
|
|
|
|
|
|
|
|
|
|
| |
|
Preferred Role: Jungle
Kog'Maw is a hyper carry ADC with high magic and health percentage damage output. Struggles in early game but becomes a great factor and asset to the team in late game due having such a great range. Spikes in lane at level 6 but lacks escape. Prefers farm lane and therefore synergies well with sustain or team that gives him escape (such as Thresh lantern). Kog'Maw is really vulnerable to CC and all-in team compositions so champions such as Leona or Blitzcrank can give him a hard time. |
|
|
|
|
|
|
|
|
|
|
|
|
|
|
|
|
|
|
|
| |
|
Bad against
|
|
|
|
|
DMG |
SPEEI |
|
|
|
|
|
|
SPEEEEEEEEEE |
Explanation
>> I could argue that Rek'Sai is not one of the easiest champions out there. The ability usage is simple but to get the most out of them is very difficult. The most obvious weakness of Rek'Sai is the tunnel vision while burrowed and then fact that tunnels can be destroyed easily. Unburrowed mode is also vulnerable to being kited and you have no answer against long ranged poke.
|
|
|
Tank |
SPE |
|
|
|
|
|
|
SPEEEEEEEEEE |
Explanation
>> I could argue that Rek'Sai is not one of the easiest champions out there. The ability usage is simple but to get the most out of them is very difficult. The most obvious weakness of Rek'Sai is the tunnel vision while burrowed and then fact that tunnels can be destroyed easily. Unburrowed mode is also vulnerable to being kited and you have no answer against long ranged poke.
|
|
|
SPEEEEEEEEEE |
Situationals:
|
|
|
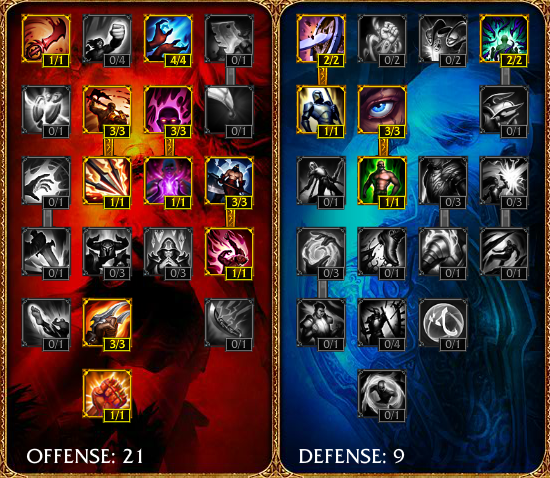
O
F
F
E
N
S
I
V
E |
sp |
M
A
S
T
E
R
I
E
S |
|
|
SPEEEEExplanation
>> I could argue that Rek'Sai is not one of the easiest champions out there. The ability usage is simple but to get the most out of them is very difficult. The most obvious weakness of Rek'Sai is the tunnel vision while burrowed and then fact that tunnels can be destroyed easily. Unburrowed mode is also vulnerable to being kited and you have no answer against long ranged poke.
|
|
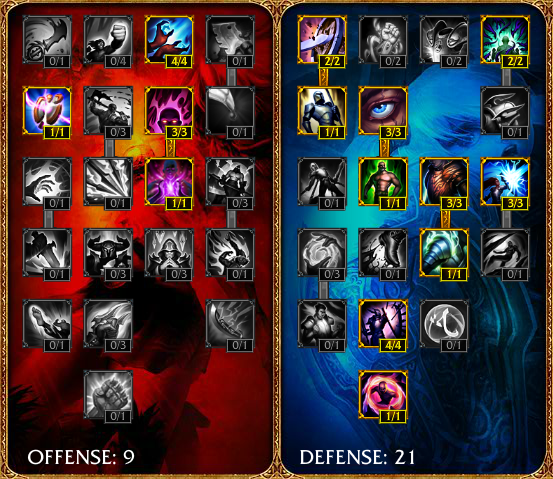
D
E
F
E
N
S
I
V
E |
sp |
M
A
S
T
E
R
I
E
S |
|
|
SPEEEEExplanation
>> I could argue that Rek'Sai is not one of the easiest champions out there. The ability usage is simple but to get the most out of them is very difficult. The most obvious weakness of Rek'Sai is the tunnel vision while burrowed and then fact that tunnels can be destroyed easily. Unburrowed mode is also vulnerable to being kited and you have no answer against long ranged poke.
|
|
|
|
|
|| |
FLASH |
|| |
Essential on nearly every champion in the game, and essential on Braum as well. It's not only the best defensive spell, but also the best offensive spell. Defensively it's used as an escape, an extra - more reliable - gap closer for you. Offensively it can be used to catch up to enemies that are trying to escape, or in order to get in range to use your abilities on your enemies. |
||
|
|
|
|| |
EXHAUST |
|| |
Exhaust is an essential spell for every game, and especially in the games where you find yourself going up against some sort of bursty assassin (the likes of Talon and Zed), an AS reliant champion (Vayne or Tryndamere) or simply when you're against an unfavourable match-up in bot lane. You also use this spell both offensively and defensively, the latter when you peel for your allies, and offensively for the damage and AS reduction which is useful during dives and 2v2 fights.
|
|
|
S
T
A
R
T |
sp |
W
I
T
H |
|
SPE |
|
SPE |
>> Very basic starting items for a long time. Every doran's item is strong starter but Doran's Blade is the best option here with Health Potion. I do not prefer Doran's Ring or boots start. Boots don't offer anything early on and you don't really need the ap from Doran's Ring. The mana regeneration would be useful but you shouldn't spam Blinding Dart that much.
|
F
I
R
S
T |
sp |
I
T
E
M
S |
|
SPE |
|
SPE |
>> Very basic starting items for a long time. Every doran's item is strong starter but Doran's Blade is the best option here with Health Potion. I do not prefer Doran's Ring or boots start. Boots don't offer anything early on and you don't really need the ap from Doran's Ring. The mana regeneration would be useful but you shouldn't spam Blinding Dart that much.
|
F
O
L
L
O
W |
sp |
W
I
T
H |
|
SPE |
|
SPE |
>> Very basic starting items for a long time. Every doran's item is strong starter but Doran's Blade is the best option here with Health Potion. I do not prefer Doran's Ring or boots start. Boots don't offer anything early on and you don't really need the ap from Doran's Ring. The mana regeneration would be useful but you shouldn't spam Blinding Dart that much.
|
F
I
N
I
S
H |
sp |
W
I
T
H |
|
SPE |
|
SPE |
>> Very basic starting items for a long time. Every doran's item is strong starter but Doran's Blade is the best option here with Health Potion. I do not prefer Doran's Ring or boots start. Boots don't offer anything early on and you don't really need the ap from Doran's Ring. The mana regeneration would be useful but you shouldn't spam Blinding Dart that much.
|
|
||
Preferred skill sequence
|
|
1 |
2 |
3 |
4 |
5 |
6 |
7 |
8 |
9 |
10 |
11 |
12 |
13 |
14 |
15 |
16 |
17 |
18
|
|
|
Q |
W |
E |
Q |
Q |
R |
Q |
E |
Q |
E |
R |
E |
E |
W |
W |
R |
W |
W
|
The ability sequence maximizes utility and damage. Like any other ultimate,
Void Rush is maxed first. Pretty much just for the cooldown reduction so you can use it for more map pressure.
Queen's Wrath / Prey Seeker is maxed first from basic abilities due it's the main damaging ability.
Furious Bite / Tunnel is maxed second for utility and more % scaling.
Burrow / Unburrow is maxed last as the level up bonus isn't too great and it's just used as CC.
Abilities
Happy Hour: Pretty good passive for jungling. Not having mana cost for abilities is always great but the regeneration passive is the key for being able to stay in the jungle for longer perioid of times.
Barrel Roll: The ability which makes Rek'Sai so ridicilously strong. Prey seeker is pretty bad and it's only used for vision but using normal AA and immediatly Queen's wrathing after gives insane dmg per AA.
Drunken Rage: Decent CC and tremor sense can used to detect enemy junglers without vision. Great for invading and seeing stealthed enemies. This can also stop damage from Lee Sin's Q, Vi's Q and many other dashes when used correctly.
Body Slam: Gives great mobility and low cooldown escape tool. You should always have tunnel up when ganking or when invading. Having tunnel in your own jungle is good for mobility and preferably you should have tunnels near lanes.
Explosive Cask: Really strong ability for more map pressure. Doesn't do much in an actual fight as it can be canceled so easily. You can try to flash over a wall and then use it for escape. The passive attack speed boost is not really noticeable but it's a neat bonus.
|
|
|
|
|
spa
|
>> It is time to explain some gameplay. I put this section in three different sections: early, mid and finally late game.
>> I will also cover the jungling routes and efficient way of clearing the jungle camps. (This also includes ganking).
>> In addition, I will try to give small tips on warding when you're laning or fighting for an objective like dragon and how the fight should be executed.
>> Credits to -NA- Veng Lmfao for the layout.
|
|
tl;dr jungling route
Smite Golems/Frog -> Buff -> Wolves/Wraith camp ->
Smite Buff -> recall or do 1 more camp. Start ganking.
|
|
space
|
>> Jungling / Early game
Rek'Sai has really good early sustain. Much better than some of the other junglers out there. Start with the Hunter's Machete + potions and go cover your buffs for invades. Get someone to help you and start with the Grump/Golems. Use your Smite as soon as the first camp spawns and continue alone to do buff. You should pick Burrow / Unburrow and go into burrowed mode for hp. Use burrowed Q and then unburrow for knock up. Use 1 normal AA after knock up and then use Queen's Wrath / Prey Seeker and eventually finish the camp.
Continue to wolves/wraiths depending on if you're blue or red side. Use burrow again to gain hp and then unburrow, AA and use Queen's Wrath / Prey Seeker at the camp. You can use Queen's Wrath / Prey Seeker twice, then go back into burrowed mode, use burrowed Q and get the second knock up (it has 10 sec cooldown on the same enemy). This way you get some hp back and get CC on the camp monsters again. Pcik your Furious Bite / Tunnel.
Go on to your second buff, using tunnel mobility and ward around it if you are afraid of enemy jungler invading. Use the same sequence as earlier but this time use Furious Bite / Tunnel after reaching 100 fury to get the best out of it. After this you may want to recall, possibly gank a lane or do 1 more camp + scuttler crab if you're healthy enough.
|
|
space
|
>> Ganking
2 things you should have up before ganking: Furious Bite / Tunnel and preferably Smite. You can ask where laner's wards are and just go around them. If you can catch up without using tunnel / Smite, do so. You want to save the tunnel to chase up after the enemy laner has used his/her escapes. Then you can just tunnel in and Smite for the slow. So you walk up to them or catch up to them with tunnel and use unburrow for knock up, 1 AA and then active Queen's Wrath / Prey Seeker immediatly after. Use furious bite after max amount of fury again.
|
|
|
space
|
>> Mid game / Dragon
You want to have tunnels everywhere basically. You want to have at least 1 tunnel near each lane to make a counter gank or just to gank a lane. It's also important to have 1 near dragon because then you can go gank the top lane and still stay relevant in a possible fight by ultimating to a near by tunnel. You should give buffs to the laners if they're not doing horrible.
In a fight, you should either initiate with tunnel and even Flash unburrow knock up a enemy carry if you have the follow up. Then pop up Queen's Wrath / Prey Seeker and finish off with Furious Bite / Tunnel. If you're still healthy enough, chase after escaping enemies with more tunnels and uburrow knock up. Tremor sense should help you to locate enemies out of sight.
Second possibility is to protect your fed carries from initiation. Like if you have 10/0 ADC and enemy has 0/10, it's probably wiser to keep your ADC relevant in the fight rather than killing the not so useful enemy ADC. You should use unburrow knock up again and then just throw everything to protect your ADC. Smite can be used to give your ADC kiting potential (unless you're fighting for dragon steal ofc). Never start dragon fight without Smite btw. It's probably one of the worst things you can do if the enemies have stealing potential.
|
|
space
|
>> Late game
The fights will basically go like previously mentioned dragon fight. You usually have to make a thinking progress whether you can go all in after an opponent or do you need to stay with your fed carry because that will win you the team fight. There is the choice of split pushing too because you have the global tunnel re-posiioning ultimate and Rek'Sai is pretty strong 1v1. Most of the fights are won 5v5 though or catching someone off-position.
|
|
|
|
|
sp
|
Thank you for reading dear viewer. I hope you have learned the ropes or at least thing or two about Rek'Sai. If you have any questions or thoughts please feel free to say so in the comment section. Unfortunately I probably won't be making a screenshots section but you can always post them in the comments and you can also contact me by sending me a PM here.
Thanks to:
❊ Jhoijhoi For coding & banners
❊ Missmaw For coding
❊ Mainted For ability icons
|


 Build Guide By Joxuu
14
0
Build Guide By Joxuu
14
0
 88,120
Views
88,120
Views
 21
Comments
21
Comments

 Thank You!


You must be logged in to comment. Please login or register.