


 Milio Support - Friendly Fire [13.15]
 Build Guide By BreadedBreadCrum
 8,412
Views
8,412
Views
 0
Comments
8,412
Views
0
Comments
Milio Build Guide By BreadedBreadCrum
0
Comments
8,412
Views
0
Comments
Milio Build Guide By BreadedBreadCrum
x
Did this guide help you? If so please give them a vote or leave a comment.
You can even win prizes by doing so!
Vote
Comment
I liked this Guide

I didn't like this Guide
 Thank You!
Your votes and comments encourage our guide authors to continue
creating helpful guides for the League of Legends community.
Recommended Items


Runes: Aery
1
2

Sorcery


Inspiration


+8 Ability Haste
+9 Adaptive (5.4 AD or 9 AP)
+6 Armor


Spells:
1
2
3
Standard Exhaust
![]()
![LoL Summoner Spell: Exhaust]()
![LoL Summoner Spell: Flash]()

Exhaust

Flash


Items
Enchanter
![]()

Start Options
![]()
Boots
![]()
Mythics
![]()
Second Item Options
![]()
Third and Fourth
![]()
Tank
![]()
Start Options
![]()
Boots
![]()
Second Item Options
![]()
Third and Fourth
![]()
Experimental Items
![]()
Dark Seal
![]()
Vigilant Wardstone
![]()
Alt-boots
![]()


Champion Build Guide
Intro
My fuemigos aren't just cute, they're also helpful. Just wait, I'll show you guys.
Introduction
Hey! This is my guide for a champion that I've been really really enjoying recently. I am an
What is your OP.gg or U.gg?
OP gg
U gg
Table of Contents
Matchup Sheet
Matchup Sheet!
This matchup sheet is still WIP, but I'll probably make support matchups, ADC matchups, and ADC synergies first, and if I feel like it I'll also detail specific top, mid, or jg matchups/synergies.
Pros and Cons
Pros+ Insane Utility + Amazing Synergies + Great Trading Patterns + Flexible Matchups + Unique CC + Fight-Changing Ultimate |
|
Cons- ADC reliant - Limited Scaling - Low CC - Low Roaming Ability - Low Synergy with AP Bruisers - Insanely low damage by yourself |
 Milio has a kit that is phenomenal when used at all(most likely cause they were released recently lol) and is often held back simply because your teammates aren't able to apply or use your abilities to their maximum effectiveness. However, despite these cons, Milio is pretty much never bad into or with any comp except if it's specifically designed to beat him or specifically designed to not work with him.
Ability Breakdown
This will be a brief look at Milio's abilities if you're getting started. These abilities are
Fired Up!
Ultra Mega Fire Kick
Cozy Campfire
Warm Hugs
Breath of Life
Fired Up!
This is essentially the main ingredient to
This scaling is what makes this ability balanced. Being 20%, it really doesn't have the best synergy with AP dominant items which is the reason you tend to build
Furthermore, I'd recommend trying to proc as many of these on an ally with AD stats as that will maximise the damage your passive can apply with its 15% AD scaling.
Ultra Mega Fire Kick
After a 0.25 casting time,
Other Stats
|
|
Cooldown : 12 at all levels | Explosion Area : 250 if Q hit a champion, 275 if Q hit a minion. | Knockback Units : 190 Units, more if its a non-champion. |
In the big spreadsheet for matchups, I'll list what abilities Milio Q should be or can be used for to get maximum effectiveness.
In lane phase, Q should be used to either cancel a hook - the easiest being
UMFK also applies
Cozy Campfire
All allies who stay in the circle also get healed every game tick(about 0.25 seconds) for 2.8-6 base plus 0.6% of
The fuemigo will then follow the ally or yourself that you originally cast it on unless recast.
After casting, you can recast W - now named Follow Them! - to make the fuemigo follow another ally or yourself.
Other Stats
|
|
Cooldown : 29-21 |
Initial Range : 650 Recast Range : 700 |
Milio W at Level 1.
Milio W at Level 5.
Milio W Recast
If you have a
There is a bit of nuance to the ability, mainly to do with extending its reach and combos associated with it.
Warm Hugs
This ability can hold up to 2 charges, with a 0.5s cooldown between uses.
Other Stats
|
|
Cooldown : 18-14 | Cast Range : 650 |
Taking this lvl 1 makes you proc
When playing with a
When playing with someone who likes to poke, whether that be
Breath of Life
Other Stats
|
|
Cooldown : 160-130, based on ability level |
Heal : 150-350 + 30% of |
This is one of the most powerful ultimates depending on enemy team compositions and is pretty much always useful due to its ability to cleanse slows alongside its heal and hard CC cleanse. Its especially useful is timed well against stuff like
I will detail what abilities you should prioritise to cleanse in each support/adc matchup in botlane in the matchup spreadsheet.
Stats, Combos, Nuance!
The previous chapter was a superficial look into Milio's abilities.
This section is for combos, maximising effectiveness, and itemisation.
Milio has many interesting properties to his kit that makes the itemisation unique among the enchanter cast. The limited AP scalings makes Milio less effective at using enchanter/mage items and, subsequently, worse at scaling effectively. Combine that with his insanely low base armour and HP, as well as his lack of mobility, which makes him super squishy.
On top of that, all 4 abilities have some of the highest cooldowns in the game, with Cozy Campfire's cooldown being 29 seconds at lvl 1.
By building ability haste, we improve a lot of the issues related with Milio. Despite being squishy, the double shield makes up for this. However, due to it's low uptime at 19 seconds, cultivating in a 38 second cooldown for both shields once both are used up means that he has terrible uptime without Ability Haste to subsidise it. This is why we build Ionian Boots of Lucidity first as it helps reduce the CD's significantly as well as giving Milio the mobility he needs to weave in and out of trading range in lane as well as to roam.
After ability haste, heal and shield power is usually the best option. Although it isn't given by any mythic, it empowers the high base healing and shielding from Cozy Campfire and Warm Hugs far more than Ability Power could due to the low scaling on those abilities.
As Milio often gets caught out by abilities due to his low mobility, Move speed is also a crucial part of his itemisation.
After ability haste, all three of these stats are about equal in effectiveness depending on enemy comp.
AP against enchanter comps or where you want to empower allies as much as possible, although its not fully recommended.
HP, Armor, and Magic Resist are about equal, although due to how assassins work, Armor tends to be the better stat overall.
This combo is barely used but is good when getting tower-dived or an enemy is low near the tower with tower aggro. Its also good if you really really need to catch someone out and you're in flash range.
Essentially, get into range where you can flash behind them and use Q to push them back into your team/tower. Its really silly and fun and I'd recommend going for it in non-serious games.
Due to how the ability is, UMFK really isn't the best engage tool. Pushing back the enemy is explicitly a disengage tool, but this doesn't mean that UMFK cant be used as an engage. The stun duration is long enough that it can net you a kill despite sending them further away.
Another way to pressure the opponent with an UMFK engage is to position in front of the wave in lane, similar to a Thresh to wall the ADC if they're alone. If they step up too far, you can aim to run behind them with the move speed from Warm Hugs and kick them back into your ADC. This is a risky thing to do, especially as you can just be hit a lot if you do it against the wrong ADC, like Caitlyn for example, but for things like Nilah who are weak without many items and has a dash you can cancel, you can use UMFK to predict her dash onto you to escape and hit her back in.
Maximising
Maximising your damage is actually quite difficult if you are playing with your ADC, even more so if you're playing with the entire team. The combo can be a couple things, but here are a couple solid combos to maximise your efficiency.
>
on yourself >
Explosion with
>
> AA with
>
Reproc > AA with
>
> AA with
>
Final Reproc > AA with
.
This looks really really complicated but its honestly pretty straightforward. Just make sure you proc the burn before triggering another instance of your shield. This is an easy build but is pretty inefficient at dealing damage quickly.
>
on yourself >
Explosion with
> Throw your AA >
> AA lands with
> Throw your AA >
> AA lands with
> Throw your AA >
Reproc > AA lands with
>
Final Reproc > AA with
This combo is even more complicated in text form but you essentially use Milio's low auto attack projectile speed to get the Fired Up! buff while its in the air to maximise your efficiency. Putting in both Warm Hugs's procs before the first reproc of Cozy Campfire is pretty difficult when at lower levels, but at higher levels and especially with Ardent Censer, this should be doable.
> AA >
on yourself > AA lands with
>
>
Explosion with
> AA >
> AA lands with
>
Reproc > AA lands with
>
Final Reproc > AA with
This combo utilises the travel time of both Ultra Mega Fire Kick and your AA's to properly maximise your burst potential.
Example Milio Combo
If you're in a lane where both enemies aren't really pressuring you or your ADC(e.g Caitlyn Soraka), you can use Ultra Mega Fire Kick to proc Manaflow Band or to get some extra poke in. Simply hit use UMFK to hit a minion and it will automatically target the nearest enemy champion. Although not too consistent, it can often hit one of them. This is your best way to build up Manaflow Band quicker.
In lanes where they have some decent lethality, its better to save UMFK to cancel engages.
This can be a great way to setup a gank from far away if the AOE explosion hits. Slowing for 40%, it can be a decent CC that may allow the Jungler and you to kill the enemy, albeit it still isn't the best engage.
Although not in lane necessarily, similar to Nami bubble, you can use UMFK to proc Fired Up! onto your allies, subsequently proccing Shurelya's Battlesong on all allies in front of you.
Although the indicator for Cozy Campfire maxes out at 1015 units, you can target an ally within about 1200-1300 units and Cozy Campfire will begin to follow them.
Although the initial proc of Fired Up! won't be applied, it will still provide the other two procs, healing, and range increase for the duration.
I often throw this on my ADC when roaming or when leaving a lane I just ganked.
This is very useful to get an assist on a kill you're far away from, as well as getting extra Shurelya procs from a distance where Warm Hugs can't be applied.
This section is for combos, maximising effectiveness, and itemisation.
Stat Priority
On top of that, all 4 abilities have some of the highest cooldowns in the game, with
Ability Haste
By building ability haste, we improve a lot of the issues related with
Heal & Shield Power and Movespeed
After ability haste, heal and shield power is usually the best option. Although it isn't given by any mythic, it empowers the high base healing and shielding from
As Milio often gets caught out by abilities due to his low mobility, Move speed is also a crucial part of his itemisation.
AP, HP, or Armor?
After ability haste, all three of these stats are about equal in effectiveness depending on enemy comp.
AP against enchanter comps or where you want to empower allies as much as possible, although its not fully recommended.
HP, Armor, and Magic Resist are about equal, although due to how assassins work, Armor tends to be the better stat overall.
Combos and Nuance
Milio Insec
This combo is barely used but is good when getting tower-dived or an enemy is low near the tower with tower aggro. Its also good if you really really need to catch someone out and you're in flash range.
Essentially, get into range where you can flash behind them and use Q to push them back into your team/tower. Its really silly and fun and I'd recommend going for it in non-serious games.
Ultra Mega Fire Kick As Engage
Due to how the ability is, UMFK really isn't the best engage tool. Pushing back the enemy is explicitly a disengage tool, but this doesn't mean that UMFK cant be used as an engage. The stun duration is long enough that it can net you a kill despite sending them further away.
Another way to pressure the opponent with an UMFK engage is to position in front of the wave in lane, similar to a
Maximising Fired Up! Damage
Maximising your damage is actually quite difficult if you are playing with your ADC, even more so if you're playing with the entire team. The combo can be a couple things, but here are a couple solid combos to maximise your efficiency.
Easy Combo
This looks really really complicated but its honestly pretty straightforward. Just make sure you proc the burn before triggering another instance of your shield. This is an easy build but is pretty inefficient at dealing damage quickly.
Medium Difficulty Combo
This combo is even more complicated in text form but you essentially use Milio's low auto attack projectile speed to get the
You really don't need to do this combo Combo
This combo utilises the travel time of both
Example Milio Combo
Ultra Mega Fire Kick in Lane
If you're in a lane where both enemies aren't really pressuring you or your ADC(e.g Caitlyn Soraka), you can use
In lanes where they have some decent lethality, its better to save UMFK to cancel engages.
This can be a great way to setup a gank from far away if the AOE explosion hits. Slowing for 40%, it can be a decent CC that may allow the Jungler and you to kill the enemy, albeit it still isn't the best engage.
Although not in lane necessarily, similar to
Cozy Campfire range increase
Although the indicator for
Although the initial proc of
I often throw this on my ADC when roaming or when leaving a lane I just ganked.
This is very useful to get an assist on a kill you're far away from, as well as getting extra Shurelya procs from a distance where
Enchanter Milio
Mythics
Shurelya's Battlesong+ Mobility + Mana Regen + Ability Haste - Low Synergy with |
Echoes of Helia+ Cheap Cost + Good Second Passive + Higher Mana Regen + Better Item Synergies + Healing - Lower Stats - Super Super Situational |
Legendary Options
|
|
RedemptionRedemption is almost always the best second item option, only really being swapped out for I'd highly recommend going this second as its provides insane utility for teamfights, something |
|
|
Chemtech PutrifierIf you need the anti-heal, go this item. Just make sure to auto attack sometimes to apply it consistently! In certain situations, if you're playing an aggressive botlane(e.g |
|
|
Ardent CenserAs Additionally, the extra attack speed on |
|
|
Staff of Flowing WaterStaff is a worse option compared to It can also build into a hybrid |
|
|
Mikael's BlessingAlthough this sounds troll as you already have a cleanse on your R, in certain circumstances where you need to cleanse more than one crucial CC or they have |
|
|
Frozen HeartIf you're going a hybrid enchanter into tank build, Frozen Heart is almost always the third item you buy if they have a majority AD. It's cheaper cost, ability haste, high armor, mana, and passives makes |
|
|
Abyssal MaskObligatory MR alternative to |
|
|
Anathema's ChainsThis is usually the last item in a hybrid build as it rounds out every stat you have, provides added utility and makes you very hard to kill if you put it on their AP champ or carry. |
|
|
Knight's VowKnight's Vow is the alternative to |
Tank Milio
Mythics
Radiant Virtue+ Self-protection + + - No Mana Regen - No AP Overall, still the better option as it goes amazing with heal and shield power from |
Locket of the Iron Solari+ Cheap Cost + Burst Control + Independent from + Armor and MR + Passive Tankiness - Lower Stats - No Mana or AP |
If you're going tank, make sure to go an early
Legendary Options
|
|
RedemptionRedemption is almost always the best second item option, only really being swapped out for For tank, this is an amazing item as it buffs the healing |
|
|
Chemtech PutrifierIf you need the anti-heal, go this item. Just auto attack sometimes to apply it consistently! In certain situations, if you're playing an aggressive botlane(e.g |
|
|
Staff of FlowingIn a tank build, as your mythic passive isn't ability haste and |
|
|
Frozen HeartIf you're going tank, Frozen Heart is almost always the third item you buy if they have a majority AD. It's cheaper cost, ability haste, high armor, mana, and passives makes |
|
|
Abyssal MaskObligatory MR alternative to |
|
|
Randuin's OmenRanduin's is a more expensive form of |
|
|
Anathema's ChainsThis is usually the last item in the tank build as it rounds out every stat you have, provides added utility and makes you very hard to kill if you put it on their AP champ or carry. |
|
|
Knight's VowKnight's Vow is the alternative to |
Runes
Summon Aery
|
|
|
|
|
|
|
|
|
|
Secondary Runes
If you're in a particularly hard lane where you might get hooked/engaged on often and they have limited poke(e.g Samira Nautilus), you can opt to go
Guardian
|
|
|
|
|
|
|
|
|
|
Secondary Runes
On top of that, as you don't have much consistency in lane due to a lack of
Lane & Vision
Laning Phase
Laning phase, much like many other enchanters,
However, due to your low damage on autos and abilities as well as low individual poke, often times your wave is pushed in quite quickly, especially with things like
Furthermore, a lot of good support players will know the weakness of
This is where important vision control in any phase comes in.
If you wanna see more specifics about Laning phase, look up at the matchup spreadsheet! I detail a little bit about each champ(mostly) about your chance of winning lane.
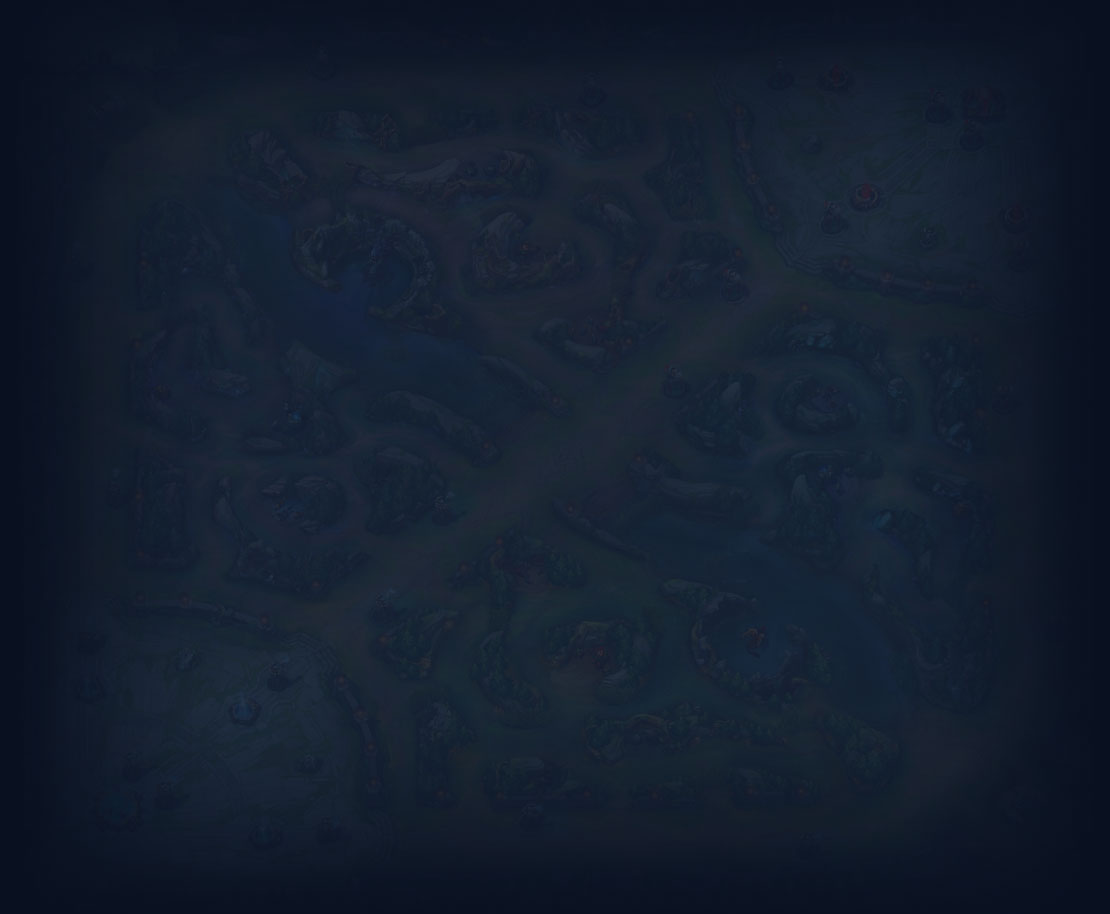
Vision
In the early to mid game, normal vision spots like the grey circled wards on the map below are typical, with the one is red side tri-bush being for cases where you are pushing in with prio often, river bush being normal vision, and the tri-bush in blue side being a more protective ward if you are getting pushed in often and they have a heavy dive jungler like


BreadedBreadCrum
Milio Guide
Milio Support - Friendly Fire [13.15]
You must be logged in to comment. Please login or register.