


 The Chain Warden of Botlane
 Build Guide By Razing42
Follow


167
11
 567,517
Views
567,517
Views
 3
Comments
3
Comments
167
11
567,517
Views
3
Comments
Thresh Build Guide By Razing42
567,517
Views
3
Comments
Thresh Build Guide By Razing42
Follow
x
Did this guide help you? If so please give them a vote or leave a comment.
You can even win prizes by doing so!
Vote
Comment
I liked this Guide

I didn't like this Guide
 Thank You!
Your votes and comments encourage our guide authors to continue
creating helpful guides for the League of Legends community.
Recommended Items


Runes: Personal Favourite
1
2
3
4

Resolve


Precision


+8 Ability Haste
+10-180 Bonus Health
+65 Base Health


Spells:
1
2
Standard
![]()
![LoL Summoner Spell: Flash]()
![LoL Summoner Spell: Ignite]()

Flash

Ignite

Items
Starting items
![]()

Quest reward
![]()
Oracles
![]()
Vision
![]()
Boots
![]()
First
![]()
Best boots
![]()
Fine options
![]()
If desperate for resists
![]()
Core items
![]()
AOE DMG
![]()
Single target
![]()
Slow fights
![]()
Roaming
![]()
Luxury items
![]()
Armor
![]()
Last item
![]()
Example builds
![]()
Default build
![]()
Early Roam
![]()


Threats & Synergies
 Threats
 Synergies
Extreme
Major
Even
Minor
Tiny
 Show All
None
Low
Ok
Strong
Ideal
Extreme Threats
Ideal Synergies


Pyke
Pyke is very slippery and will also roam faster than you. Try to punish the enemy adc when he leaves and be aware that he has the tools to do the same to your adc if you leave for too long.


Draven
Draven enjoys playing with someone with strong pick potential. Be proactive and help him snowball his lead.


 Synergies
Ideal
Strong
Ok
Low
None
Draven
Draven enjoys playing with someone with strong pick potential. Be proactive and help him snowball his lead.


Champion Build Guide
Table of Contents
Recent Changes
 25.14 Guardian nerfSEASON 2 25.925.6 Warmog's armor buffNew season
Why Play Thresh?
|
PROS
+ Very strong early+ Good engage and disengage tools + You will have a lot of agency + Very fun to play If you want to play a support champion that can save teammates, lock down single targets very effectively or control multiple enemies with a 5-man |
|
CONS
- Very skill dependent- Will struggle with weak adc - Has no sustain - Gets outscaled by enchanters |
Different Build Examples
In this chapter I'll go over a few build examples and when to go for them. You don't have to follow a single option and can mix and match as these are only suggestions despite having good synergies in each build.
Default build:
This build is probably the most standard build for Thresh as it works into just about anything and is never bad.
These are the two main pieces that will help you peel for your entire team and give a little extra to one specific carry. You can obviously swap the order if you don't need any MR from Locket of the Iron Solari early or if the enemy has mostly single target damage focused onto your ADC then Knight's Vow would be better first. Frozen Heart is really good against most AD champions that'll dive your backline and still helps against a lot of ranged champions as well, but can be changed into any other item you may need from the item section.
Early roam aggression:
This build will be for you who want to have an easier time roaming across the map and affecting every lane with your early game presence.
/
/
Works best if your Adc isn't going to be in too much danger if you leave the lane for an extended amount of time or if the enemy Support will be roaming as much as you.
Choosing between the two boot options is mostly a personal choice. I prefer to take Synchronized Souls as they give similar MS and evolve to be way faster. Boots of Swiftness are still really solid boots if you are playing against a lot of slows, but don't upgrade them to Swiftmarch.
Because of the lack of Haste in this build you can take Precision second to get Legend: Haste to get more BASIC Haste.
Alternatively you can go Domination to get even more MS from Relentless Hunter.
Front-to-back:
This build is more focused on full teamfight supporting rather than peeling for one specific hard carry and is probably my favourite build.
It works best when the fights are going to be slower front-to-back fights where you'll have an easier time using your Redemption without your teammates needing to run away. Revitalize synergizes really well with this setup and Guardian adds even more value.
Default build:
This build is probably the most standard build for
These are the two main pieces that will help you peel for your entire team and give a little extra to one specific carry. You can obviously swap the order if you don't need any MR from
Early roam aggression:
This build will be for you who want to have an easier time roaming across the map and affecting every lane with your early game presence.
Works best if your Adc isn't going to be in too much danger if you leave the lane for an extended amount of time or if the enemy Support will be roaming as much as you.
Choosing between the two boot options is mostly a personal choice. I prefer to take
Because of the lack of Haste in this build you can take
Alternatively you can go
Front-to-back:
This build is more focused on full teamfight supporting rather than peeling for one specific hard carry and is probably my favourite build.
It works best when the fights are going to be slower front-to-back fights where you'll have an easier time using your
Keystone Cheatsheet
|
GUARDIAN |
AFTERSHOCK |
GLACIAL AUGMENT |
|
Runes: Resolve
|
RESOLVE
|
|
|
|
|
So if you need to go |
|
|
|
INSPIRATION
|
|
Runes: Inspiration
|
INSPIRATION
|
|
|
|
|
|
|
|
|
RESOLVE
|
(Stay mindful of not wasting |
Rune Shards
|
Rune Shards
|
|
|
|
|
|
Niche Runes
These secondary rune options are more niche and not something I would recommend to someone just trying out Thresh, but if you have more experience and want to try something new and exciting these runes are good situational options.
|
PRECISION
|
|
|
DOMINATION
|
|
Boots
I'm currently a big fan of being fast af, and I strongly suggest going for either
A while ago I always went
If you really need extra resists or tenacity then
Tier 3 upgrades
Tier 3 upgrades become availible to you if your team were able to take 2 out of the 3 "Feats of Strength" and you have TWO legendary items in your inventory. As a support however your
Items
|
|
|
Against AOE DMG Locket of the iron solari is an incredible default item for supports when you don't know what to buy. Especially good against enemies with a lot of AOE dmg. |
|
|
|
Against single target DMG Knight's Vow is tailor-made for |
|
|
|
Speedy roams Trailblazer is a good item that gives you and your teammates movespeed to cross the map faster. (Don't buy this as a second item, it should only be a first item for tempo) |
|
|
|
Big teamfight heal Redemption is a great teamfight item, it helps in keeping your entire team alive during a fight. Don't be afraid of using it before a fight if you're about to take an objective. |
|
|
|
Anti-Attack Speed Armor, haste and even mana are all good stats on him and the added benefits of the passives make this a really compelling item when facing multple AD or AA based champions. |
|
|
|
Anti-healing Thornmail has been shrunken down so it's now more viable to buy as a support. Gives a decent amount of stats for the cost as well as Grievous Wounds. |
|
|
|
Aggressive MR Abyssal mask makes your AP damage dealers do more damage to enemies close to you. Cheap item for a lot of MR and haste. |
|
|
|
Defensive MR Kaenic Rookern is a more defensive option for if don't have any AP damage to amplify from your teammates. |
|
|
|
Anti hard CC item Mikael's Blessing gives you more oppurtunities to peel your team if the enemy has some hard hitting CC spells e.g |
|
|
|
Big health bar Warmog's armor gives a lot of health and regen. A greedy and expensive third item option against poke teams where you can't choose between armor or MR. (Make sure you have |
Abilities
|
Warding Chapter
Warding is an important skill for any support player to master, but even more so for a support like Thresh where you thrive in the fog of war, catching enemies when they are unaware of your presence as they're trying to rotate from one lane to another.
These ward maps will help you place wards that will be effective in most games, but do note that when against certain junglers or laners you will need different wards. For example a Zac can gank you from further away over walls while a Shaco can gank over walls while being stealthed. Against these junglers consider placing deeper wards (if it's safe to do so) to spot them when they're clearing their jungle camps.
Early game wards for blue and red side
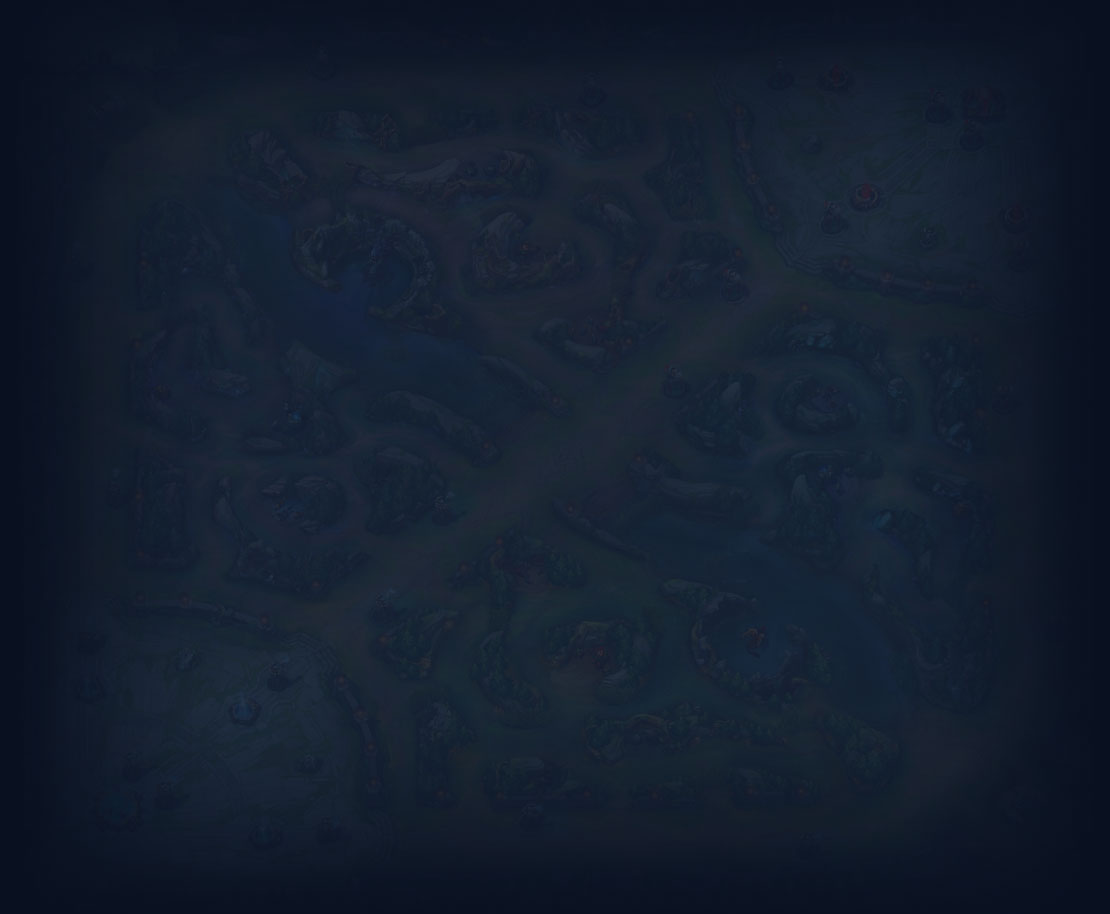

Mid game wards for mid and river control
Late game wards for objectives
Ward placements
These specific ward spots can take some practice to get them right so I would recommend that you do some "ward drills" in a Practice tool game until you can place them consistently. If you're struggling with the consistency do these drills before you queue up for your games that day as a sort of warm-up. Make sure to have indicators enabled to more easily see where the ward will get placed.
Drake pit wards
Baron pit wards
These ward maps will help you place wards that will be effective in most games, but do note that when against certain junglers or laners you will need different wards. For example a
Early game wards for blue and red side
Mid game wards for mid and river control
Late game wards for objectives
Ward placements
These specific ward spots can take some practice to get them right so I would recommend that you do some "ward drills" in a Practice tool game until you can place them consistently. If you're struggling with the consistency do these drills before you queue up for your games that day as a sort of warm-up. Make sure to have indicators enabled to more easily see where the ward will get placed.
Drake pit wardsBaron pit wards
Random Tidbits
This chapter will have random information and tips regarding that didn't fit into the guide elsewhere.
Runes:
Taking Revitalize may look odd on Thresh as he only has a weak shield on his Dark Passage, but it will also buff your Guardian, Font of Life, Second Wind, Locket of the Iron Solari and your Redemption. The small 5% heal and shield power (+10% extra on targets below 40% HP) may not look like a lot but it will add up over the course of a game.
Assuming you don't miss a single minion death then Overgrowth will give you the 3.5% bonus max HP on the wave that arrives in lane at 10:30. At that point the other part of Overgrowth gives you 45 HP. At this point Damnation will have dropped around 42 Souls giving you 42 armor and AP. Needless to say that in a real game you will be missing some minions either from roaming, recalling or being forced off the wave so realistically this rune will take longer to fully come online.
Health Scaling vs Flat Health in the bottom row of rune shards? Generally scaling shards are worse on supports as we get less XP than other roles and we need to fight early especially on Thresh. So I would recommend taking Flat Health. Against some scaling matchups however you can be greedy and take the Health Scaling.
If you really need tenacity you're better off just buying Mercury's Treads instead of taking the Tenacity and Slow Resist rune shard in my opinion.
Cosmic Insight lowers the cooldown of Flash by 56 seconds which will give you a large window where you will have it up and the enemy wont if you both use Flash at the same time.
Going Ionian Boots of Lucidity in addition with Cosmic Insight lowers the cooldown by 69 seconds instead. nice
Legend: Haste actually gives you BASIC ABILITY Haste. This means that it won't affect your ultimate abilty. On Thresh this is kind of irrelevant.
What does matter though is that the Haste that you get from Legend: Haste will not show up in your stats tab next to your portrait in game, so it will look like you have less Haste than you actually have.
Even though it doesn't show up in your stats it still affects your cooldowns of your basic abilities.
Thresh's Adaptive Type is AD and will not change to AP no matter how many souls he gets from Damnation. The only way to change Adaptive Force from AD to AP is by buying an item that has AP like for example Shurelya's Battlesong (which I don't recommend).
Items:
The damage taken from Knight's Vow deactivates your Synchronized Souls and cancels your recall even if the damage is only from minions.
When in a fight without your Knight's Vow target (whether they're dead or just not in the fight) you should try to change your mark to another teammate. This way you're still getting value from the passive. Another thing to remember is that the target doesn't have to be your adc. If your adc is super behind while your midlaner is smurfing you should change priorities. Don't get stuck in the mindset of having to support only your adc!
Solstice Sleigh is not a heal it only gives bonus HP, so it is not affected by grievous wounds or heal & shield power. Think of it as a mini Wild Growth.
If you finish your support quest and are starting to have regrets over your choice of item (whether you missclicked the wrong item or think another item will have more value) you can sell your Solstice Sleigh and buy Celestial Opposition from the shop. This does cost you 240 gold because you only get 160 gold from selling it and then you have to pay 400 gold to buy it again so it's not super ideal, but it is good to know for those awkward times when you accidentally click the wrong one or get into a really long game. Generally I'd say that Solstice Sleigh gets outscaled by Celestial Opposition.
Selling and rebuying your support item does NOT remove the wards that you have placed on the map.
Abilities:
Generally starting with Flay is best as it gives you more power and allows for both proactive trades and defensive peel, however when playing against a double ranged botlane I like starting Death Sentence as it gives me the opportunity to catch the enemy off guard level 1.
When you hit a Death Sentence on someone don't immediately use Flay. Instead wait for your Death Sentence to tug them in twice and then Flay them right after your Death Sentence ends. This way you can CC them for longer and potentially cancel their dash/jump with your Flay. Most people will be spamming their escape button during your Death Sentence so this way you will be more likely to cancel their Rocket Jump for example. If you're struggling with the timing then spend a few minutes in Practice Tool and you can get it down pretty fast.
Runes:
Taking
Assuming you don't miss a single minion death then
If you really need tenacity you're better off just buying
Going
What does matter though is that the Haste that you get from
Even though it doesn't show up in your stats it still affects your cooldowns of your basic abilities.
Items:
The damage taken from
When in a fight without your
If you finish your support quest and are starting to have regrets over your choice of item (whether you missclicked the wrong item or think another item will have more value) you can sell your
Selling and rebuying your support item does NOT remove the wards that you have placed on the map.
Abilities:
Generally starting with
When you hit a
Ending Notes
If you have any questions please leave them in the comment section, I'd gladly answer any questions you have!
Special thanks to jhoijhoi for their great guide to coding.
Special thanks to jhoijhoi for their great guide to coding.


 YouTube
 Twitch
The Chain Warden of Botlane
You must be logged in to comment. Please login or register.