





Not Updated For Current Season
This guide has not yet been updated for the current season. Please keep this in mind while reading. You can see the most recently updated guides on the browse guides page
x
 [8.15] The Leencyclopedia
 Build Guide By Duosora
11
3
Build Guide By Duosora
11
3
 93,280
Views
93,280
Views
 7
Comments
7
Comments
11
3
93,280
Views
7
Comments
Lee Sin Build Guide By Duosora
93,280
Views
7
Comments
Lee Sin Build Guide By Duosora
x
Did this guide help you? If so please give them a vote or leave a comment.
You can even win prizes by doing so!
Vote
Comment
I liked this Guide

I didn't like this Guide
 Thank You!
Your votes and comments encourage our guide authors to continue
creating helpful guides for the League of Legends community.
Runes:

Domination





Precision



Spells:

Flash

Smite
Items


Early MR
![]()

Offensive Slots
![]()


Defensive Slots (Pick Two)
![]()


Choose Your Elixir
![]()


Ability Order

Flurry (PASSIVE)
Lee Sin Passive Ability





>> Table of Contents <<
The Goal
«… A young summoner sits in his room and turns the pages of a book in his hands. It's his diary. A journey of his goal. A meaning of his life... His own meaning.
Every time he turns the page, his facial expression changes. Some pages make him mad. Some of them put a smile on his face. Some trigger deep thoughts in his soul. They are all different but there is a fact which unites them all: they are all meaningful. Victories, defeats, rages, teases, blames, surrenders... He truly knows everything of these. This diary is a large proof of his experience.
He grabs yet another page in his hand to turn it. His face suddenly freezes.
«Here it is» - he said. «The thing I fear the most.»
The page he stopped turning the book on was the first one. The time has come for him to read it from the very start once more.
«Perfection never comes on its own...» - he started reading. «...Achieving it is a hard work on your mind, technique and spirit»
A perfectly strong spirit will never break, no matter how hard things get. Same goes for a summoner of the Blind Monk.
A warrior's perfect spirit is very adaptive. …»
Introduction
|
Greetings, League community. I'm Simplar Duosora, the one behind the graphics, content and idea of this guide. Hope you'll find it useful and fun to read! It's a pity that there was no really comprehensive Lee Sin guide before this one, despite his popularity. There was a lot of material about Lee already, though it took a lot of time for me too to watch many videos and understand how Lee combos work, how his synergy works and so on. This is why I've decided to make THE Lee Sin bible for you to use. He's really fun champion to play and rewarding to master, so you should definitely give it a shot to learn him! It's true that I am far from being a perfect Lee Sin since I reside in mid-silver (somewhere around Silver III on a moment of writing this), but improving my skill is always a part of my player experience. The guide uses the experience of high elo Lee Sin players together with my analysis. This made this guide easy to read and easy to understand. |

* Image by Ryuuuna
|
Pros & Cons
|
+ Mobi-lee-ty + Uti-lee-ty + Variabi-lee-ty Lee Sin is a splendid solo queue pick. With all the tools he got, he easily adapts to nearly any possible team comp. Together with this, his insane mobility from Sonic Wave / Resonating Strike and Safeguard and his general utility provided by his whole kit all make Lee a really versatile and useful champion which is also fun to play. |
|
- Decea-sin-g - Discompo-sin-g - Abu-sin-g Despite all his good sides, Lee Sin is still bad in a couple of things. First of all, he falls off hard when it comes to the late game. He may also dismoral (e.g. tilt) a player if something goes wrong. To do well as Lee Sin, playing to improve isn't enough. You must always play to win to avoid being abused by the enemy team. Moreover, comebacks on Lee Sin are very difficult.
|
The preseason is here, and so are the new runes. This new system merged old runes and masteries in one simplier system which is way more handy to both describe and use.
 How did the old system work | Historical
How does the current system work
There are 60 different choices in total, splitted between 5 paths: Precision, Domination, Sorcery, Resolve and Inspiration. Every path has a choice of 3 keystones and a choice of 9 different runes.
In every rune page you create, you can pick up one primary path and one secondary path. In primary path, you have to choose one of 3-4 different keystones and 3 out of 9-10 different runes, split between 3 different rows. You can pick only one rune from one row. In secondary path, you can pick up 2 out of 9-10 different runes from that secondary path (the row rule still applies there).
Moreover, you are getting the special trait bonus of your primary path (these traits are listed below in specific path sections).
Where are paths, keystone and runes located? Look at this screenshot!Just saying, I won't be stopping in detailed rune descriptions, as you can read the most updated data by clicking on a rune's icon, so I'll just state my opinion of their current viability with
Lee Sin.
Precision's Traits:
- The Merciless Elite (Domination secondary): Grants 10 Ability Power or 6 bonus Attack Damage (Adaptive) as well as 9% bonus Attack Speed.
- The Brazen Prefect (Sorcery secondary): Grants 10 Ability Power or 6 bonus Attack Damage (Adaptive) as well as 9% bonus Attack Speed.
- The Eternal Champion (Resolve secondary): Grants 15-135 (based on level) bonus Health as well as 9% bonus Attack Speed.
- The Savant (Inspiration secondary): Grants 18% bonus Attack Speed.
|
|
Press the Attack Probably the best keystone in this tree if you'll ever decide to use it as your primary. If you'll weave some basic attacks in your combo, you'll get bonus damage from your burst combo which may come in handy if you are facing a lot of tanky champions you cannot really burst by using Domination runes. Be warned that it might slow down your combos so don't use it at all if you are against a team of champions which can be killed in one quick burst. | |
|
|
Lethal Tempo That's a keystone for auto attack reliant champions without ability to disengage from a fight. Lee Sin is clearly not in the list of these champions as he can both engage and disengage very well. Exceeding the attack speed cap (if he'll ever reaches one), as well as a lot of bonus attack speed, is inefficient choice for him due to Flurry in his kit and more reliance on ability combos than on auto attacks. | |
|
|
Fleet Footwork A keystone which promotes a playstyle of kiting an opponent (attacking them and moving a bit, repeat until your enemy is killed). That's clearly not what Lee Sin likes to do with his quick combos, so skip the keystone: it's for kiting champions, not for bursting them. | |
|
|
Conqueror This keystone is more of a choice for champions which specialize on long trades, as it requires you to stay in combat for quite a while before its effect is enabled. Lee Sin is a champion which relies a lot on burst damage, so he needs something which can be used in synergy with it. It's not someone like Olaf, Yasuo or Irelia: this keystone isn't even decent with The Blind Monk. |
|
|
|
| ||
|
Overheal
This is a situative choice for Lee Sin, and it's only considered together with healers by your side ( Soraka, Sona, Janna or Nami): 300% conversion into a shield is not a joke: it will allow your allies to utilize their heals to their full extent. If you're going to initiate a lot and you know you'll get excessively healed, pick that thing. |
Triumph
A bit of additional gold and quite good extra healing after killing any enemy champion: what's not to love here? Lee Sin is one of these champions which can pull off painful engages since early game and this rune compliments his dedication to be a hero, which makes it a splendid choice. |
Presence of Mind
Lee Sin has no mana, using energy instead. The ult cooldown refund is a good thing but here are two things: first, the ult cooldown refund is nifty, but (!) second: the heal you receive from Triumph (it's 12% of your maximum health, you know) is way more noticeable and important as it both prevents enemy Ignite from executing you after a dangerous fight and compensates some of the health you might have lost during the trade with your opponent. Skip this choice. |
|
|
|
| ||
|
Legend: Alacrity
A potential bonus of 18% Attack Speed. It will speed up Lee's clears which is important in games where you are going to contest objectives a lot and/or where your successful early game must bring you what you need to extend the lead by securing objectives. |
Legend: Tenacity
A potential bonus of 30% Tenacity. Good to take if your enemies got a lot of crowd control and you can't afford to buy Mercury's Treads. Please note that you cannot reduce a crowd control duration below 0.5 seconds, so don't overinvest in this stat. In most cases, taking this rune alone and Elixir of Iron will already do. |
Legend: Bloodline
A potential bonus of 8% Lifesteal. This works well with your Iron Will but is rarely useful on Lee due to his already nice innate lifesteal and spell vamp. Consider using something else of these choices. |
|
|
|
| ||
|
Coup de Grace
A good contribution to your deadliness. With Lee Sin already having an execute in his Resonating Strike, this rune will increase both its damage and all other ability damage if the target is already peeled low enough to trigger this rune's bonus. |
Cut Down
This option works best against the team of tanks as it outperforms Coup de Grace versus them. Be it Sion, Yorick, Dr. Mundo or Cho'Gath: they won't escape the wrath of your fist. |
Last Stand
This option works on champions like Olaf or Tryndamere which like to stay low health as they benefit from staying like that. Lee Sin can't really use it well as he prefers staying high health, not low. |
Domination's Traits:
- The Twisted Surgeon (Precision secondary): Grants 5.5% bonus Attack Speed as well as 14 Ability Power or 8.4 bonus Attack Damage (Adaptive).
- The Aether Blade (Sorcery secondary): Grants 20 Ability Power or 12 bonus Attack Damage (Adaptive).
- The Immortal Butcher (Resolve secondary): Grants 15-135 (based on level) bonus Health as well as 10 Ability Power or 6 bonus Attack Damage (Adaptive).
- The Wicked Maestro (Inspiration secondary): Grants 20 Ability Power or 12 bonus Attack Damage (Adaptive).
|
|
Electrocute There are a couple of things worth mentioning here. Lee Sin has this keystone choice as a staple one, as he has a lot of ways to fast proc it, thanks to Sonic Wave/ Resonating Strike and Flurry. It adds power to his burst damage, and Lee Sin loves to have higher burst damage to finish his target off much quicker than it could even manage to say 'ow'. Stick to this keystone. | |
|
|
Predator I strongly disagree with picking it on Lee Sin. There are much better users of this keystone like Warwick, Hecarim or Rammus which benefit really much from extra movement speed. Lee Sin has enough mobility with his wards and Safeguard, plus enemies can easily break Predator's channel. Just say no to this keystone. | |
|
|
Dark Harvest This choice is actually very, very viable to pick on Lee Sin to increase his late game damage. Just imagine how easy these turrets and these enemies will break with that new technique! Now you can finally catch up with late game champions and optionally become a great split pusher, especially after you will be soul charged! Attack a turret, attack a larget minion to finish him off, attack a turret once more. Boom! Turret down. Pick that whenever you can splitpush well or if you face late game comps incase you fail to close the game early. | |
|
|
Hail of Blades A latest addition to Domination tree, this keystone just won't do well with Lee. The only way I maybe see it working is to compensate some of the Energy loss in synergy with your Flurry and it overall makes it easier to apply Flurry during your combos. But looking on other choices of this tree it's just not worth it. Choose either Electrocute or Dark Harvest. |
|
|
|
| ||
|
Cheap Shot
Your way to go when teamed up with hard crowd control setups (if you have Leona, Alistar, Sejuani, Nautilus or similar champions in your team, just pick this mastery so they could boost your damage with their utility). This is your way to go with allies having hard CC. |
Taste of Blood
Holy pepperonis level synergy with Overheal and Spirit Visage! You are going to enjoy this occasional sustain which could proc when you are in middle of the fight with an enemy. It helps to turn this fight around with just a bit of extra health you can get. |
Sudden Impact
I must admit, this thing has pretty nice synergy with Lee Sin's Resonating Strike and Safeguard: both are dashes, and both will give him that desired bonus. I'd call this a staple rune out of these three for general case. It will give you much more that other two choices unless the conditions stated below them are met. Besides, even its icon shows Lee Sin dashing! |
|
|
|
| ||
|
Zombie Ward
Sadly, Lee Sin's Safeguard cannot interact with spell-untargetable Zombie Wards, so its main utility for him is already denied. Not even the extra damage on ward takedown compensates the loss of ability to hop on these wards with Safeguard as it won't outweigh other choices of this triplet. |
Ghost Poro
This choice is what I would call a staple choice for Lee Sin here. Ghost Poro has a lot of great usages, ranging from tracking the enemy jungler's position to being aware of your own jungle state. Just be careful with where you place your Ghost Poro as it goes on a cooldown if he gets scared out. This rune also supports invades due to the extra damage it gives you for being in the enemy territory. |
Eyeball Collection
That's a good optional choice against those teams where you can snowball pretty fast. It is small but nice addition of AD. Remember to not go this rune unless you are legit sure that you are going to grab and extend your early lead as much as possible as it won't be as good. |
|
|
|
|
| |||
|
Ravenous Hunter
Complements your Iron Will well. Can be a good choice under the same condition which I have stated back on Legend: Bloodline - this works well with your Iron Will but is rarely useful on Lee due to his already nice innate lifesteal and spell vamp. |
Ingenious Hunter
This is probably a staple choice of all four. It also reduces a cooldown of your trinket, which clearly means more wards per second for you. Thus, more often ward jumping with Safeguard and/or providing faster vision for your team whenever they need it. All active items also benefit of this rune. |
Relentless Hunter
Very nice niche option for different roamers like Talon, Quinn, Rengar and similar ones. They all enjoy extra movement speed out of combat. Once again, I would recommend to use this one on Lee Sin only in cases when he must buy Mobility Boots because then he will have immense synergy with them. |
Ultimate Hunter
I would probably choose between Ingenious Hunter and Ultimate Hunter, as your ultimate has pretty long cooldown time which can slow down your insecs or ganks as Lee relies on his ultimate as mush as he does on wards. If you feel like you will need presence in fights more than extra mobility, choose this one. |
Sorcery's Traits:
- The Incontestable Spellslinger (Precision secondary): Grants 5.5% bonus Attack Speed as well as 14 Ability Power or 8.4 bonus Attack Damage (Adaptive).
- The Calamity (Domination secondary): Grants 20 Ability Power or 12 bonus Attack Damage (Adaptive).
- The Ancient One (Resolve secondary): Grants 15-135 (based on level) bonus Health as well as 10 Ability Power or 6 bonus Attack Damage (Adaptive).
- The Cryptic (Inspiration secondary): Grants 20 Ability Power or 12 bonus Attack Damage (Adaptive).
|
|
Summon Aery I won't say that a pet companion which synergies with whole Lee Sin's kit is a waste of keystone. Quite the contrary - one of his best choices in this path if he decides to show off some... sorcerous skills. I mean, to be a sustain support. | |
|
|
Arcane Comet This keystone is pretty interesting if we think about comboing it with Lee Sin's Cripple. Literally, any slow almost guarantees hitting the Arcane Comet on a target. Now that we think about it, how it works with area of effect abilities? It goes on the position of the first damaged target. It's probably closest target to Lee Sin but still needs more testing. | |
|
|
Phase Rush Simple and clean, I don't think Lee Sin makes that much use of that keystone as he won't need much movement speed with his insane innate mobility. Choose between other keystones. |
|
|
|
| ||
|
Nullifying Orb
That's very, very good choice when facing a lot of mages, as it stacks with Hexdrinker and Maw of Malmortius's Lifeline passive shield. I recommend to use it as a situative choice, but not as something you staple to (it will be useless when facing, for example, a full AD team with no magic damage). |
Manaflow Band
This rune has a great synergy with Lee Sin overall, as it works with both mana and energy: it'll go well along with Flurry. Despite its cooldown is pretty high, I'll still recommend it as a staple choice, as you can allow yourself to do pretty crazy ability bursts without inserting auto attacks between them and then just proc the Manaflow Band, which will surprise your enemy thinking you ran out of energy and need attacks to restore it. |
Nimbus Cloak
Why would Lee Sin need movement speed after ulting a target? I mean, really. He has insane mobility with his Sonic Wave/ Resonating Strike and Safeguard, which is more than enough to reposition or secure a kill. Choose between other options of this row, as they provide much more utility to Lee than this one. |
|
|
|
| ||
|
Transcendence
This rune allows you to turn cooldown reduction overcap into something pretty useful. Honestly, I wouldn't recommend using it on Lee Sin as he is more of an early game champion and he won't be getting a lot of cooldown reduction early on. His correct full build gives him exactly the cooldown reduction cap, so by picking this rune you are cutting down half its efficiency. Say no to it. |
Celerity
I imagine it being viable on movement speed dependant champions like Rammus or Hecarim, but not on dash dependant champions like Riven or Lee Sin. They simply cannot utilize it to its extent, so I see this rune as a bad, if not the worst pick for the Blind Monk in this triplet. Just skip it and leave it be. |
Absolute Focus
That's both your best and your staple choice from these three. First, Lee Sin is actual..lee real...lee good at staying high health, mainly thanks to his Safeguard / Iron Will. You can actually do your jungle clears in a manner that you won't even lose much health, so you are going to keep the bonus with almost 97% uptime. Totally worth. |
|
|
|
| ||
|
Scorch
If you are planning to pick Lee Sin for laning, you would really want this rune for that because your trading power becomes somewhat better with the extra Sonic Wave / Resonating Strike damage. It also adds another form of magic damage in your kit (apart from Tempest, of course), which makes itemizing armor against you less efficient. |
Waterwalking
Your staple choice there. It helps with securing and contesting objectives (Rift Scuttlers, Elemental Dragons, Rift Herald, Baron Nashor) with its extra stats and movement speed it provides. If you want to pick some Sorcery runes, I definitely recommend you this one for jungling. If your are playing non-Summoner's Rift mode (3v3, ARAM), you should staple to another rune to the right of this one. |
Gathering Storm
It would be great on Lee Sin for preventing him from weakening that much in late game if only his scalings on spells would be better. Agree, Lee Sin cannot afford himself to basic attack his enemy too much, he has to rely on his abilities and mobility, as else he'll get deleted by some enemy Vayne or Draven which got somehow fed on bottom lane. Not really good choice. |
Resolve's Traits:
- The Imperious Behemoth (Precision secondary): Grants 15-135 (based on level) bonus Health as well as 9% bonus Attack Speed.
- The Leviathan (Domination secondary): Grants 15-135 (based on level) bonus Health as well as 9 Ability Power or 5.4 bonus Attack Damage (Adaptive).
- The Arcane Colossus (Sorcery secondary): Grants 15-135 (based on level) bonus Health as well as 10 Ability Power or 6 bonus Attack Damage (Adaptive).
- The Enlightened Titan (Inspiration secondary): Grants 30-270 (based on level) bonus Health.
|
|
Grasp of the Undying Good one if you are planning to get a lot of health on Lee Sin and prefer making him more tanky. Probably, it's only useful if you are going to lane with Lee, but as we are going to focus on jung-lee-r, I'll skip him being a laner and simply exclude this keystone from my possible choices in Resolve tree. | |
|
|
Aftershock Pretty awesome synergy with Lee Sin's ultimate, Dragon's Rage, if you ask me. It's a source of hard crowd control in Lee's kit and it procs this keystone just perfectly. I'd call it a staple keystone in this path for Lee Sin because if you are picking Resolve as your primary path, you confirm by all means that you are planning to go tanky Lee Sin. | |
|
|
Guardian This keystone (combined with this path, of course) is going to be insane on tank supports with unit-target abilities (especially shields) like Taric. Of course, supportive Lee Sin also makes a good use of this mastery thanks to his Safeguard and I expect to see more support Lee players in close future, so keep in mind that you can use Guardian on support Lee Sin. |
|
|
|
| ||
|
Demolish
If you are going to use health for tankiness, this is your choice unless someone else like Yorick, Cho'Gath or Sion in your team got it already (it has a champion-specific cooldown and a turret-specific cooldown: you can only proc multiple demolishes on one turret after some delay). In that case, address other options. |
Font of Life
Its effect procs from Dragon's Rage and Cripple, so you can't expect it to be procced too often. Thus, bail away from this rune choice as it's not even close to being as effective on Lee Sin as other options he may use of this triplet. |
Bone Plating
That's going to make us significantly more durable, especially early on, when even a small damage matters. Of course, it can be countered by Lulu's Pix, Faerie Companion, but generally that's a nice choice which can be picked in the majority of cases (except teams with aforementioned Lulu). |
|
|
|
| ||
|
Conditioning
This rune makes Lee tankier after a delay. This rune shines in mid-late game when Lee Sin has tanky items and this rune helps him to make more use of their stats by increasing overall tankiness per each tanky item he buys. Only use it if you plan to go mostly tank or offtank items (e.g. Maw of Malmortius etc.). |
Second Wind
It complements Warmog's Armor's passive by restoring health in combat (that is, if you buy it), also reminds me of empowered Spectre's Cowl's regeneration effect. It is boosted by Spirit Visage, which can potentially result health tank Lee Sin being a viable pick. Pick it when you must have a sustain during ganks and teamfights. |
Chrysalis
Say hello to your staple rune choice. It gives you extra health, allowing you to stay healthier during your clears and then it complements your success in ganking and securing kills, giving you more power to keep snowballing. In my personal opinion, this rune is the most comfortable choice of this triplet. |
|
|
|
| ||
|
Overgrowth
Many champions love late game, but not Lee Sin. I can imagine it being very benefittable on health tanks like Dr. Mundo or Sion (yeah, especially Sion with his endlessly stacking health!), but again, not on Lee Sin. Our monk needs something different than this percent health growth. Address another options. |
Revitalize
This rune will boost your Safeguard's shield, but not really anything else that you have (no effect on Iron Will, it won't proc from lifesteal and spell vamp, it won't increase your health regeneration). Though, if you got a heal or shield bot support in your team (I mean Soraka, Ivern, Lulu, Sona, Janna and similar ones), I would recommend picking this rune. |
Unflinching
I see this rune pretty abuseable with Lee Sin's flash insec combo (read Combos section of this guide for more in-depth details about it). Every time you are going in and casting your Flash (or Smite), you are going to get some extra slow resistance and tenacity. Not the best, but viable choice from that triplet. |
Inspiration's Traits:
- The Elegant Duelist (Precision secondary): Grants 20% bonus Attack Speed.
- The Ruthless Visionary (Domination secondary): Grants 22 Ability Power or 13.2 bonus Attack Damage (Adaptive).
- The Stargazer (Sorcery secondary): Grants 22 Ability Power or 13.2 bonus Attack Damage (Adaptive).
- The Timeless (Resolve secondary): Grants 35-300 (based on level) bonus Health.
|
|
Unsealed Spellbook I gotta clarify that you are not looking to swap your summoner spells (both Flash and Smite are improtant for you), you are only looking for the massive cooldown reduction on them. So ignore your summoner shards and only use it for more frequent plays throughout the map. | |
|
|
Glacial Augment This keystone mastery is going to be very strong if you plan building Randuin's Omenor Turbo Chemtank on Lee Sin, as the right timed usage of its actives will most likely secure a couple of kills for you or your teams. Freeze Rays are really strong as of now, so I would recommend picking it if you have practiced your combo timing well enough to ignore picking Unsealed Spellbook. | |
|
|
Kleptomancy Picking this keystone on Lee Sin is both clever and foolish. From one side, you are getting a bit of bonus range to your attacks ( Lee Sin has a ton of abilities in his kit, so he can proc it frequently) and some extra gold, but from another side, this forces you to enter a risk of trying to land many attacks on your enemy. Even though many stuffs it allows you to pickpocket are actually useful, I'd avoid using Kleptomancy on all champions but ones like Ezreal, Gangplank and Ekko because of their on-hit effect application mechanics which allows them to proc Kleptomancy from distance. |
|
|
|
| ||
|
Hextech Flashtraption
I don't think you can get much use of an extra flash mostly because of its delay and that channeling which prevents you from moving during the channel. I would explore another options from this triplet to pick, as Lee Sin mostly need Flash for insec combos and for sneaky changing the direction of his Dragon's Rage. Say no to it. |
Magical Footwear
Free boots? That sounds great! Extra stats from obtained boots? Now that sounds even better! This will allow you to spend more gold on other items and get boots automatically around the time you would actually build them. I see this as Lee Sin's staple rune choice from this triplet because he simply has more benefit from it. |
Perfect Timing
Lee Sin and stasis items are simply not worth to combine together (like, seriously, a Lee Sin with Zhonya's Hourglass will be mostly considered a troll itemization in your team's mind). Simply said, just avoid picking this rune and you'll be fine, you are not going mid lane to suffer from heavy bursts ( Zed, Syndra, etc) from your lane opponent. No. |
|
|
|
| ||
|
Future's Market
Lee Sin prefers to close games early, so reaching his item spikes a little bit quicker is a great opportunity to do it, if you can watch after your gold well and foresee its usage. for the current of game. I advise you to train using this rune in custom games before taking that to the real game. See how much you will owe, see how much you will need. Make conclusions. |
Biscuit Delivery
Staple choice from this triplet if you are picking it. In League, obtaining free stuff is great, especially when it's good, as it economies your gold to spend for something better. Even though I see this rune more of a supportive choice because supports are on a low economy role, I still recommend to use it while playing other roles as it's free sustain and it regenerates 20% of your missing health with one biscuit (you got no mana). If you time it well, you are going to profit from this mastery a ton. |
Minion Dematerializer
This rune is probably going to become the local meme soon. Say ps-s-s-sht for quick pushing the lane early on! Probably, this is going to work best on support Lee Sin, but come on, dematerializing minions is too fun to resist it! Besides, the Q-through-minion combo also gets much better and safer with this thing! Just keep in mind you are going to have one of your item slots occupied till you use all six dematerializers. |
|
|
|
| ||
|
Cosmic Insight
Your clean, uncontested staple choice. It allows you to reduce your Flash and Smite cooldowns, it makes your abilities recharge a bit faster. If comboed with some source of Energy restoration, this rune makes you a midgame beast (you'll have enough cooldown reduction to synergize with to that time). Worth taking for its versatility. |
Approach Velocity
I can imagine this rune being a good synergy with Soraka's passive, but Lee Sin already has a lot of built-in mobility in his kit and he won't have much problems to catch up with his opponent if played smart. If you are a beginner Lee Sin and would like to try this rune, I won't deny you to, as it helps roaming to the place where you are needed much quicker. |
Time Warp Tonic
Extra healing from potions along with that extra mobility over their duration will speed up your overall jungle clears with Refillable Potion's usage. Thing is, Lee never uses/needs as much potions to make this rune useful throughout the game, thanks to his Iron Will, so forfeit yourself from choosing that option. |
Abilities
It's the time to explain the abi-lee-ties of
Lee Sin so you can get a better idea on how they work. It's important to read this part before proceeding forward as to start learning combos, you need to have a general information about Lee Sin's skillset.|
|
Flurry Cost: none Cooldown: none After using an ability, Lee Sin's next 2 basic attacks within 3 seconds gain 40% bonus attack speed, returning 20/30/40 energy (on levels 1/7/13) on the first attack and 10/15/20 energy (on levels 1/7/13) on the second.This passive ability raises Lee Sin's early power a lot, but with it, it's one of the hardest passive abilities in game to use well since to maximize its usage you need to insert 2 basic attacks between each ability usage.Tips and Tricks |
|
|
Sonic Wave Cost: 50 energy Cooldown: 11/10/9/8/7 seconds Lee Sin fires a sonic blast in the target direction, dealing [50/75/100/125/150 (+BonusAD)] physical damage to the first enemy it hits and granting true sight of them for 3 seconds. | |
|
|
Resonating Strike Cost: 30 energy Cooldown: none Lee Sin dashes to the enemy marked by Sonic Wave, dealing [50/75/100/125/150 (+BonusAD) (+Target%MissingHP*0.01)] physical damage, up to [100/150/200/250/300 (+2*BonusAD)].This is one of the signature abilities of Lee Sin. The way it's used in differs good Lee players from bad ones. Chasing, poking, fight forcing, gap closing, escaping... It has a lot of uses and a good Lee player is able to make the most of it. Moreover, it's worth to remember that Resonating Strike in an execute, so it can be used as a finisher. Generally, as they say, train, practice and one day you will achieve perfection.Tips and Tricks |
|
|
Safeguard Cost: 50 energy Cooldown: 12 seconds Lee Sin dashes to the target ally or friendly ward. If the ally is a champion, both they and Lee Sin are shielded for 2 seconds for [55/110/165/220/275 (+0.8*AP)] damage and Safeguard's cooldown is reduced by 50%. Lee Sin can self-cast Safeguard to shield himself. | |
|
|
Iron Will Cost: 30 energy Cooldown: none For next 4 seconds, Lee Sin gains 10%/15%/20%/25%/30% bonus life steal and spell vamp.A very strong defensive ability which also contributes to Lee Sin's mobility a lot because of Safeguard's versatile usage. This is what makes Lee Sin both more tanky and more useful.Tips and Tricks |
|
|
Tempest Cost: 50 energy Cooldown: 10 seconds Lee Sin smashes the ground, dealing [80/120/160/200/240 (+BonusAD)] magic damage to nearby enemies and granting sight of them for 4 seconds. | |
|
|
Cripple Cost: 30 energy Cooldown: none Lee Sin slows all enemies in range and marked by Tempest by [20%/30%/40%/50%/60%] for 4 seconds, decaying over the duration.A nice soft control / chasing ability. It's also good for purposes of tricking your enemies which think that Lee Sin is only about physical damage. You should note that Tempest's sight works different, not like Sonic Wave's.Tips and Tricks |
|
|
Dragon's Rage Cost: none Cooldown: 110/85/60 seconds Lee Sin roundhouse kicks the target enemy champion, instantly rooting them for 0.25 seconds, dealing [150/375/600 (+2*BonusAD)] physical damage and knocking them back over 1 second. Enemies hit by the enemy-turned-projectile receive the ability damage plus bonus physical damage equal to 12%/15%/18% of kicked target's bonus health and are also knocked up for 1 second.HIKU!!! ..oh, so, where were we...? Ah, yes. This is a very strong control ability, allowing Lee Sin to be useful in both teamfights and duels. Its usage also distinguishes a good Lee Sin player. It might be hard to read but actually it's pretty simple to understand: Lee targets an enemy and kicks this enemy back from Lee, damaging and knocking up everything which collides with the target he kicked.Tips and Tricks |
To give more clarity on ability order, let me tell you what is used when.
AD Bruiser Lee SinTanky Lee SinFull Damage Lee Sin
Items
Now that you know your abilities, it's also good to know which items is it good to get on
Lee Sin. I am going to be as detailed as possible while describing the items to provide you the best insight possible. Usually, one item chosen right in the right time and order can determine the game. So it's definitely important to know your itemization while playing Lee Sin.|
Starting Items (Jungle)
|
|
|
Hunter's Machete is very good starting item if you are going in the jungle as Lee Sin. First, the on-hit damage it provides has a great synergy with Flurry which makes it possible to proc this damage faster with its bonus attack speed. Apart of that, the life steal in the jungle has awesome synergy together with Iron Will. So, faster clears and better sustain makes it highly preferrable starting item for a jungle Lee Sin (which is also chosen a lot in a pro scene, and for a reason).
|
|
|
Hunter's Talisman is a decent alternative to Hunter's Machete as a starting item only because of the sustain. Overall, it's less useful to Lee Sin to start with this item over starting with a Hunter's Machete since Lee Sin don't have any mana and the item won't boost his energy regeneration. Moreover, Hunter's Talisman excels on champions which got area of effect abilities (like Shyvana's Inferno Aegis). Lee Sin only has a high cooldown Tempest as an area of effect damage, so it's not the best choice to take aswell.
|
|
|
Refillable Potion is generally chosen over Health Potion on Lee Sin as it recharges every time you enter the base and is a massive gold economy on potions because of that. Though, if you think you are going to get invaded (for example, if enemies got Blitzcrank or Thresh in their team, they might invade with a high probability; if their jungler is Shaco, also watch out for potential invades), it's better to start 3x Health Potion initially as you might want to keep yourself healthier for the possibly upcoming duel to outtrade your enemy.
|
|
|
Stealth Ward over other trinkets because of getting some vision for the Blind Monk, so you could gather information from the minimap (more details in Warding section of this guide). Also, for Safeguard's ward jump purposes.
|
|
Starting Items (Lane)
|
|
|
Cloth Armor is a good start versus a lot of physical damage poke (for example, if you are facing Pantheon or Jayce). Works even better together with a couple of Health Potions because it'll deny a good ton of poke.
|
|
|
Long Sword is a splendid start because it will speed up the crafting of one of your most important core items while laning as Lee Sin: Tiamat. Along with that, this item provides pretty nice extra physical damage which will make your spells hurt more. Use it against these matchups which you hard counter (see more details in Matchups section).
|
|
|
Corrupting Potion is kind of subpar choice for Lee Sin as the mana sustain is wasted and the bonus damage isn't that notable as it is on a champion like Yorick (his Mist Walkers are able to proc the extra damage with each their attack). Skip it for something more useful.
|
|
|
Doran's Shield is a good defensive starting item for laning and it works good against tanky matchups like Sion, Garen, Darius and, as a special case, Heimerdinger where you need to catch up with their basic health regeneration to beat them. It also gives a ton of innate healing. Together with something like Spectre's Cowl you are getting a Dr. Mundo level health regeneration.
|
|
|
Doran's Blade is a nice general start on Lee Sin. Extra health, life steal and attack damage all make this item a good all-rounder. Use it versus these matchups where you have a bit of advantage to extend it a bit more.
|
|
|
Boots is a nice start versus skillshot-based matchups ( Ziggs, Ezreal, Xerath, Brand are good examples) so you can dodge their poke easier. Of course, when you get more experienced with these, you can start something else, but in many cases this option is still the best to start with against them.
|
|
|
Health Potion is generally taken together with any starting item (excluding Corrupting Potion). It helps you to regenerate the damage taken from your opponent.
|
|
|
Stealth Ward is taken on lane for the same reason as in the jungle: Safeguard's ward jumps and getting some vision across the lane.
|
|
Jungle Item: Upgrades & Enchantments
|
|
|
Skirmisher's Sabre is taken when you are playing versus high damage assassin which snowballs better than you for some reason since this jungle item upgrade will chop off 20% of the damage dealt to you by the target of the Challenging Smite provided by this item. Basically, this is a secondary jungle item upgrade choice when your team falls too behind to some bursty assassin (good examples are Talon, Akali, Kassadin or LeBlanc).
|
|
|
Stalker's Blade is taken when your enemies are too mobile and you cannot catch up with them. The Chilling Smite of this jungle item upgrade allows you to fix things up and ensure that your target won't escape, let alone the good synergy of this upgrade with your Cripple and some damage from the Chilling Smite itself. Consider this as an option versus someone like Hecarim or Rammus.
|
|
|
Enchantment: Warrior is the most popular jungle item enchantment on Lee Sin. It's for a solid reason: Cooldown Reduction and Attack Damage is pretty much everything that any Lee Sin player needs early on to be stronger. Actually, he benefits so much from bonus Attack Damage so there is basically nothing else to consider for the most efficient early damage improvement. Take this in vast majority of games.
|
|
|
Enchantment: Cinderhulk is a solid option of Lee Sin's jungle item enchantment. It is sometimes used in a pro scene when you need to be tankier and useful more than dealing damage. If you are playing a 5v5 with friends and you see that they are doing good, take this enchantment. First of all, it has a nice synergy with any health providing items by increasing their utility on you even more and, as a result, boosting stat efficiency. Moreover, the Immolate passive of this enchantment makes your jungle clears even better than just with Tiamat by dealing consistently noticeable extra damage to champions and even more to minions and jungle monsters (have your Lee Seen that 200% increased damage in the description of this enchantment?). Definitely a viable option for tankier Lee Sin builds.
|
|
Boots
|
|
|
Ninja Tabi is the perfect boot choice when you are facing a physical damage oriented (especially low crowd control and basic attack reliant, like Caitlyn, Kindred, Olaf, Draven, Kayle) team to chop off a decent part of their damage. This will help you to live longer and, as a result, keep stomping them while laughing on low dps they do to you. Yes, you'll realize it works like that when you will try equipping tabis against basic attackers! Honestly, best feeling ever.
|
|
|
Mobility Boots... Actually, more like Boost of Mobility. This is the shortest and the most informative description I can ever think of about this item. In short, it gives Lee Sin more opportunities to counterjungle, faster roams and more mobi-lee-ty overall! This will be your ordinary choice of boots as they boost the strong side of Lee Sin: his excessive mobility.
|
|
|
Mercury's Treads. Get these boots and say goodbye to that annoying Morgana with her Dark Binding, cutting its duration short. Also say goodbye to this annoying Pantheon with his on-target stuns. Moreover, the magic resistance provided by these boots is able to keep you alive more versus heavy magic damage comps. Keep an eye on these teams.
|
Overall, remember a simple rule:
Ninja Tabi against basic attack reliant enemies, Mercury's Treads against heavy crowd control and Mobility Boots in all other cases (especially early roams).Now you know how to choose your boots!
|
Basic Items
|
|
|
Tiamat gives a lot of power to Lee Sin's early game both in lane and in the jungle, giving him both life steal and some damage in an area around him which triggers on both activating the item and basic attacking an enemy. Get this as early as possible, preferrably on the first back since this item will give a large spike to your power. Build Order: Long Sword -> Long Sword -> Rejuvenation BeadGetting bead before long swords will instantly spoiler the enemy that you are going Tiamat, so better avoid buying a bead first.
|
|
|
Caulfield's Warhammer is a good item on Lee Sin since it gives him some Attack Damage and Cooldown Reduction. Preferrable to get it if you are ahead and going to get Enchantment: Warrior since it'll help extending your lead.
|
|
|
Phage is yet another very important buy as it boosts Lee Sin's mobility and chasing potential with its hit-and-run style of usage. Get it to prevent kiting ( Gnar, Kalista) if you are going to upgrade it to Trinity Force or Black Cleaver, both options are okay. Build Order: Long Sword -> Ruby CrystalDamage over health early on, so LS over Ruby. |
|
|
Sheen may seem an odd buy on Lee Sin as he don't have mana as a resource and uses Energy instead, but it may be a worthy buy to significantly increase your damage for trades and to extend your lead if your team is winning. The basic attack damage bonus from Spellblade is what makes both Sheen and Trinity Force good items to buy on Lee Sin to extend his lead with an extra damage. Also it's worth to mention that Lee Sin has 116 base Attack Damage on level 18 which is just 30 less than Mordekaiser has (note that Trinity Force is one of his core items for the high coefficient). If you are doubt to Sheen or not to Sheen, look at the champion's base Attack Damage at level 18. If it is above 110, getting Sheen into Trinity Force is worth it. Else it's not.
|
|
|
Hexdrinker is a mix of an offensive and defensive item. Comes in handy to rush when some sort of mage or AP assassin got way too uncontrollably fed. Or in general versus heavy AP enemy comps. It gives you a nice damage along with a nice shield. Its upgrade, Maw of Malmortius, is also nice on Lee Sin. Consider getting vs magic damage.
|
|
Offensive Items
|
|
|
Black Cleaver is one of your core items. It is useful because it shreds a ton of armor, including base armor too. Moreover, it procs by basic attacks, Sonic Wave, Resonating Strike and Dragon's Rage. Basically, by everything which deals physical damage. One simple combo done right could fully stack this item's passive. Get it every single game for armor shred and damage boost.
|
|
|
Trinity Force is one of the most expensive (if not the most expensive), though it is the most all-rounded and useful item in this game. The bonus attack damage, attack speed, a huge chunk of damage with from Spellblade, everything is so good about this item (apart from its high price and the fact that Lee Sin doesn't use mana, though) that its pros on Lee Sin highly overcome its cons. Every time when you need to drastically extend your lead, get this item to greatly delay yourself from falling off. It's the main solution to one of the main problems of Lee Sin: his withering in late game. Definitely consider getting it as an option of hyper offensive item slot.
|
|
|
Titanic Hydra is pretty good item to have on Lee Sin. It increases your damage along with your tankiness and gives a basic attack reset. It's what makes this item great: even more waveclear, a possibility to quickly proc both attacks of your Flurry, super synergy with health items ( Enchantment: Cinderhulk is also on that list too) and a fair amount of tankiness together with its other features. Consider it one of Lee Sin's core offensive items along with Black Cleaver.
|
|
|
Maw of Malmortius is just like Hexdrinker, but better and stronger. The same rules apply to it as to Hexdrinker which I did describe a while ago already. Things to add are that it provides a ton of magic resistance and a stronger shield which makes it perfect offensive anti-magic item on Lee Sin. It is only worth to build when you are either a bit ahead or a bit behind the enemy's AP carry (it'll help to safely extend your own lead). Though, go for anti-magic defensive items if you fell way too behind as this item won't be as efficient as other ones will be.
|
|
|
Ohmwrecker is good on Lee Sin as on any diver. First question you may have is why did I put Ohmwrecker along with offensive items. The answer is simple: because despite its defensive stats this item is made for offensive and very aggressive towerdiving plays. In addition to that, just imagine the satisfying feeling of turning off the two enemy nexus towers for 3 seconds to give your team a nice window to destroy these enemies... it will be also useful against these ones who prefer to hide under their towers. Time to turn these structures against their teams!
|
|
|
Guardian Angel turned into a really nice item for Lee Sin after it got Attack Damage on it. It's yet another mix of an offensive and defensive item (this time, it is against physical damage, which makes it Hexdrinker's alternative with armor instead of magic resistance). Together with its revival component, it's basically a free Chronoshift for your needs. Use it whenever you get hard focused by heavy burst champions or in general against heavy physical damage enemy teams.
|
|
Defensive Items
|
|
|
Death's Dance is surprisingly pretty rare to see on Lee Sin as a defensive item. It gives you time to shield or outsustain any incoming heavy burst, has a nice synergy with Lee Sin's Iron Will and any other life steal. It gives a lot of attack damage, a window to deny an incoming damage and extra life steal. For its cost, the item itself is truly efficient. It works especially well against executes like Garen's Demacian Justice or Veigar's Primordial Burst, delaying a part of their damage to give you a time window to react. Basically, I highly recommend this item against any sort of heavy burst (now go an surprise that Xerath or their mega fed Lux with the fact that her combo was not enough to deal with you!).
|
|
|
Randuin's Omen is a very nice defensive item against attack speed basedand critical strike based champions (their Yasuo, Caitlyn, Draven, Vayne or Kayle can partially say goodbye to their high damage when attacking you). It also helps to slow them down for a brief moment so you can deliver your flashy kicks right where they are needed.
|
|
|
Dead Man's Plate is one of these go-to options when it comes to protecting yourself from physical damage. I believe it has a strong reason to take this place: what else could increase your mobility, your damage and provide decent defensive stats against physical damage in one slot? Moreover, Lee Sin's constant dashing also allows to fast charge Dreadnought's passive. Imagine it together with Trinity Force - try it at least once! - fully charge Dreadnought, cast your Resonating Strike and get the AWESOME feeling of discharging Dreadnought with the basic attack and removing a ton of enemy's health with just one attack. Defensive itemization never been so much fun, trust my word for it. On top of that, it is a nice tool to quickly escape from an enemy which chases you or lead him into a trap quite faster than usually.
|
|
|
Spirit Visage is a go-to option against heavy magic damage. The extra health regeneration, the notable bonus to your self-heals ( Iron Will together with all your other sustain you have got), the good amount of magic resistance makes it feel like this item was specially made for Lee Sin to use. Go for it every time when you are facing heavy poke-reliant magic damage enemy teams.
|
|
|
Sterak's Gage is an efficient way to increase your health when you need more efficiency on your armor and magic resist and it is also efficient against something like Darius or Fiora since these fellows love to do true damage on their enemies and health is the best thing you can get against true damage. For example, if Darius applied too much bleed with his Hemorrhage and it's about to finish you off, Sterak's shield will pop up to safe you. Bonus points for using Safeguard aswell.
|
|
|
Bloodthirster is a pretty nice defensive sustain provider. While working good on all basic attack based champions, it also works fine on Lee Sin because he got Iron Will for synergy with every other sustain. So, if your enemies got Morellonomicon or Executioner's Calling, it's time to transcend them by using this item to apply heavier damage while outsustaining their heal reductions. Perfect for quick health regains, it may be expensive, but situatively perfect item to get.
|
|
Elixirs
|
Always remember: elixirs are either bought after your whole item build is completed or when you need a bit of stat boost to ensure a win of an important fight!
|
|
Elixir of Iron is the best general elixir to choose on Lee Sin. It provides more tankiness, more tenacity and increases the overall level of tankiness and overall utility of all resistances which you have bought on your way to victory.
|
|
|
Elixir of Wrath increases your attack damage and overall sustain (good synergy with your Iron Will). Take it if your team needs to ensure a lead as your damage will fly up to the skies with this small yet powerful potion.
|
|
Lee's item order
|
Itemization isn't difficult, just keep asking yourself right question to find the answer what to pick. See the full analysis under the spoiler to get an idea!
Jungle Bruiser Lee
Combos
The fun part about playing Lee is that he got a lot of combos. I will structurize them by difficulty, from easiest to hardest. If you know another combo and it's not featured here, don't hesitate to send it in the discussion of this guide and it will get in that list too!
stands for Place a ward
stands for Auto Attack (or Basic Attack).[#x] stands for 'do the combo number x'.
Now, on to the list of combos!
|
#
|
Name
|
Difficulty
|
Sequence
|
Details
|
| 1 |
2-Hit Flurry | 1/5 |
-
-
-
| This is the simpliest of all combos. Land your first Q, attack twice, press your second Q. Practice it in Practice Tool in order to get an idea of Lee's playstyle. |
| 2 |
3-Hit Flurry | 1/5 |
-
-
-
-
| A stronger version of the previous combo. Perfect for farming the jungle. You can do this combo only if you have enough attack speed. |
| 3 | Jungle Punch Series | 1/5 |
-
-
-[#2]-
-
| This combo is simply perfect for farming jungle camps when you only got your Q. Just keep track of your basic attacks to not mess up. |
| 4 | Ward Jump | 1/5 |
-
| One of these bread and butter combos of Lee Sin. Place any ward and then use Safeguard on it. |
| 5 |
Instant Tempest | 1/5 |
-
| Cast Tempest and flash in a close range to an enemy. This will reduce the time window for an enemy to react on an engage. One of rare basic combos of Lee, still useful. |
| 6 |
Dragon's Rage Direction Changer | 1/5 |
-
| Cast Dragon's Rage and flash right after to relocate yourself. The knockback will use Lee's position after the flash for a knockback direction definition, so if you want to surprise your enemy, use this combo. It's simple to use and understand. |
| 7 | Mind Changer | 2/5 |
-
-[#4] | Time it before you'll reach your target with Resonating Strike. You can also jump on an ally. Ward is not necessary for doing that combo, but it needs the right timing. |
| 8 | Sonic Wave Through Minion | 2/5 |
-
-
| A good way to surprise your enemy. A minion behind Lee and his enemy will make him feel safe because (as he thinks) minion will 'zone' Lee from engaging. This combo proves that it's not always right. Before using the combo, left click the minion. If Smite has enough true damage to finish off this minion, do this combo to increase the chance of hitting your Q and adding an element of surprise. |
| 9 | Objective Steal | 2/5 |
-
-
| To do this combo correctly, you need to cast Smite right before you reach the target with your Resonating Strike. This simple trick makes Lee an effective objective stealer. Practice it in a Practice Tool to perfectly time it. |
| 10 | Steal & Escape | 2/5 |
-[#9]-
| Same as the previous one, but it also allows you to quickly escape after stealing an objective. This will force a couple of enemy flashes or dashes because they will want to chase you up. |
| 11 | Steal, Escape & Punish | 2/5 |
[#10]-
-
| Same as the previous one but with a sustainful Dragon's Rage kickback to restore some health for yourself along with kicking the flashed enemy so he won't be able to chase you. |
| 12 |
Extended Flurry | 2/5 |
-[#2]-
-
-
-
-
-
-
-
-
-
-
-
-
-
| Pretty easy to use against isolated immobile tanky targets with a ton of health.You can finish it off with repeating 3-Hit Flurry combo ([#2]) or even adding a Dragon's Rage cast right after. |
| 13 | Basic Skirmish Combo | 2/5 |
-
-
-
-
| The most complicated part of this combo is to get in a close range to an enemy without firing Resonating Strike before your Tempest. You can also extend this combo by attacking and casting E right after you finish this combo to slow your opponent and land two more attacks. |
| 14 | Skillshot Dodger | 2/5 |
-[#4]-
| If you are able to do it fast enough, you can dodge many narrow skillshots like Ezreal's Mystic Shot, Morgana's Dark Binding or Elise's Cocoon and land your Resonating Strike right after. This combo has the power to force your enemy to flash or waste the escape with you still catching up to him. Activate your W again and use AA-E-AA if you can finish off your enemy. |
| 15 | Target Execution | 2/5 |
-
-
| Pretty easy to understand. You must hit Sonic Wave on an enemy, use Dragon's Rage to knock this enemy back and cast Resonating Strike while the ulted target is mid-air. Reasons to use? First, this hurts. Second, this allows you to quickly catch up with the target you just knocked away. |
| 16 | Ward Insec | 3/5 |
-[#4]-
-
| Another bread and butter combo of Lee Sin. It's actually pretty difficult to pull off properly. 'Insec' means that you jump in a group of enemies (or one enemy) and knock one or a couple of them back to the place where you are safer than the enemy. Lee Sin and Azir are the most popular champions which are able to use insecs. Highly recommend to practice this trick versus your friends in a custom game before trying to do it in a real game (so you won't be able to clearly predict their moves and get more productive insec practice). You must place a ward behind your enemy so you'll ult him away from his allies. |
| 17 | Flash Insec | 3/5 |
-[#6]-
| Same as above, but you flash behind your enemy instead of ward jumping. Note that you must press your ultimate right before flashing since the ultimate has a 0.25 second cast time and flashing after starting its cast will change its direction. |
| 18 | Flash Ward Insec | 3/5 |
-
-[#4]-
-
| A bit different insec. This version does that same good ol' insec but you must flash to the enemy (over the skillshot like Ezreal's Trueshot Barrage or Ashe's Enchanted Crystal Arrow), then ward jump behind and cast your ultimate. This trick allows you to bait out enemy's powerful ability and then knock the enemy to a place where you are safe. Worth to practice since it's really powerful if used right. |
| 19 |
Insec + Flurry | 4/5 |
[#16, #17 or #18]-
-
-
-
-
-
-
-
-
-
-
| Use any insec and this punch series. It's a pretty long combo and requires you to master kiting but if done right, it simply means a ton of damage unleashed on your enemy. |
| 20 | On-Dash Ult | 4/5 |
[#4 or
-
]-
| Now this is a rare trick not many Lee Sin players know. You need to press Dragon's Rage exactly during your dash. It can be used on any nearby target, not necessarily on the target of your Resonating Strike. It's pretty difficult to pull off since you must decide quickly if the situation favors using that combo. |
| 21 | A Blast From The Past | 5/5 |
-
(attack the Blast Cone)-
| Once again, rare and really hard combo to pull off. It is one more way to proc Courage of the Colossus (if you will decide to use this mastery) and is also a good way to isolate the enemy the way you want. |
| 22 | Angular Knockback | 5/5 |
-[#4]-[#21] | Probably, one of the hardest Lee combos I know. You ult your enemy near the Blast Cone, then wardjump to it, and use it to blast your enemy off in another direction. It is pretty fancy when done right. |
Matchups
For
Lee Sin, many jungle matchups are played in similar way, so it would be better for overall comprehension to split every League champion up by four categories: farm junglers, gank junglers, control junglers and special cases. Then it will be a lot easier to understand general playstyles followed by different enemies which makes it simple. Agree, it'll be easier to memorize types of junglers and countering them instead of listing every individual matchup and writing almost the same information over, and over, and over again.|
Playing against farm junglers
|
Farm junglers are a type of junglers which want to farm a lot during early game to reach late game sooner. In late game, they are unstoppable monsters. The notable examples of such junglers are
Master Yi, Kayle, Shyvana, Nocturne and Cho'Gath.When playing against a farm jungler, keep that in mind. Their weak sides are their early game which can be abused by you (you can make an early invade and catch your enemy there, resulting your early kill in most cases) and their low gank presence (you will always outgank your enemy if you are playing the game right). Pay attention to where they start as it will assist you in determining their current position on a map.
If you will screw up their early game by invading and killing them, they won't be able to snowball themselves, provided that you won't ever stop invading them and stealing their jungle camps. This makes them being able to take objectives only together with their team, along with forcing them to tax their lanes (that's the way they may comeback: if their jungle and objectives are missing, then they either show themselves on a lane and steal their teammate's farm (partially) or ragequit the game).
Make your item build the way like enemy jungler do not exist as they won't do any major harm being countered by your map influence. Keep watching their slots, though: after they've made it past three full slots, think about grabbing defense against them. Else don't even bother: keep farming your own jungle, their jungle, themselves, their allies on their lanes. Any farm jungler is a free win matchup when Lee knowing what he's doing.
|
Playing against gank junglers
|
Gank junglers are a type of junglers which spend more time ganking lanes than farming the jungle. The good examples of gank junglers are
Evelynn, Kha'Zix, Rengar and Lee Sin himself.Generally, any gank jungler is a skill matchup for
Lee Sin. As you and your enemy got approximately equal gank potential, you got two choices: either initiate a gank yourself and expect a countergank from your enemy or wait for your enemy to gank and countergank yourself. It all depends on when is the situation more likely to turn on your advantage: a jungler like Evelynn, for example, got no escapes when her ultimate is on cooldown, so when she ganks a lane, get to the countergank: by wasting all crowd control she has and with her ultimate on cooldown, you have a huge chance for her gank ending up with two kills for you or forcing your enemies to use Flash to get away from you.If you are ahead by objectives, feel free to keep extending your lead as you'll win in every situation of encountering a gank jungler after that.
|
Playing against control junglers
|
Control junglers are that type of junglers which aim to invade you a lot and got everything they need to establish and maintain map pressure. They can easily track you while you can barely track them. The good examples of control junglers are
Kindred, Rek'Sai, Shaco, Nidalee and, which worth a special mention, Ivern.So, this type of junglers is pretty creative of what they do and when they do it. As they are hardest case to counter for a gank jungler like
Lee Sin, I'm marking these as the hardest matchups to him. They can start anywhere (even if it's your own buff and/or raptors), they act like they did already own you and are just extending their lead, they can pretend to play like a gank junglers while actually counterganking you and snagging your stuff out from under you, making you believe they weren't there.Sounds odd? I totally understand!
Ivern, for example, can use a cheese jungle strategy to cut down your early game by going Teleport- Smite summoner spells and placing a ward near one of your buffs. Then he marks two of his packs, teleports to your buff, marks and smites it and then goes back to his jungle to take that same buff from his jungle. That way, you've got a 5 minute penalty issued by this annoying little tree. Kindred can be predictable by watching the minimap and arriving to the marked camp way before they do. Shaco invades you early on and steals your buff out from under you. We can dwell in endless debates about control junglers' tricks to put you down, so just believe that they have got a whole lot of options to do so.To counter a control jungler, you must first discover his position on a map. If they are farming, then farm yourself too. If they are ganking, always countergank them. If they are invading you or taking an objective, make haste there so they won't get too much bounty for clearing your whole jungle side. Alternatively, you can go to any closest free lane and get farm from there. This way, you are countering their income by getting at least the same amount of gold by your action. If they are taking objective, always force your team to contest it but don't even try to do it alone if you are either even or behind.
Warding
Establishing and maintaining smart vision always was one of the most important parts of success in League of Legends. That's because vision gives you and your allies vital parts of information about your enemies' positions in a map and their plans/intentions in the foreseeable future. Vision is especially significant in solo queue games due to the lack of coordination in most of the matches. Let's make
Lee Sin much less blind when he does this decisions!You can primarily get information by warding. And here comes the interesting problem I'm sure Lee players did face before at least once after both Sightstone and Tracker's Knife got deleted: how can
Lee Sin establish vision if he needs wards for jumping and having more mobility? The answer to this problem lies on the surface.People tend to think that if you are the only source of vision (for example, if you are in a solo queue game and got no duo partner to trust with warding), then your
Control Ward goes for jumping and your trinkets go for warding. Else your trinkets go for jumping and Control Ward goes for warding one important spot. By thinking like that they forget that if you are placing a Control Ward on a visible spot right in front of your enemy, you are basically giving him a part of your gold for free later when he gets your ward done. So remember that your Control Ward ALWAYS goes for warding - no exceptions!Now, where were we... Treat warding as an inner contest happening between your team and their team alongside the contest for the nexus. Warding allows you to get information which is used for smart macro play, allowing your team to get rid of the isolated enemy or, for example, snag an objective whenever enemies are far from it and have no tools or opportunity to get there quickly. This is why wards which provide efficient vision and are hard to contest are extremely valuable tools in game.
First thing you should know it's not necessary to place your wards only in brushes and nowhere else. That's because both brushes and dragon / baron pits are the most common places people use their control wards in, which reveal and disable your stealth wards.
Oracle Lens isn't a nice thing to such wards either. This is the reason you must make your wards less scoutable and obvious, yet providing necessary vision to you and your allies.Blue Jungle WardingRed Jungle WardingNeutral Objective Warding
Jungling
You should absolutely read this flowchart. This way, you'll grasp the way junglers usually think in.
Click the chart for HD quality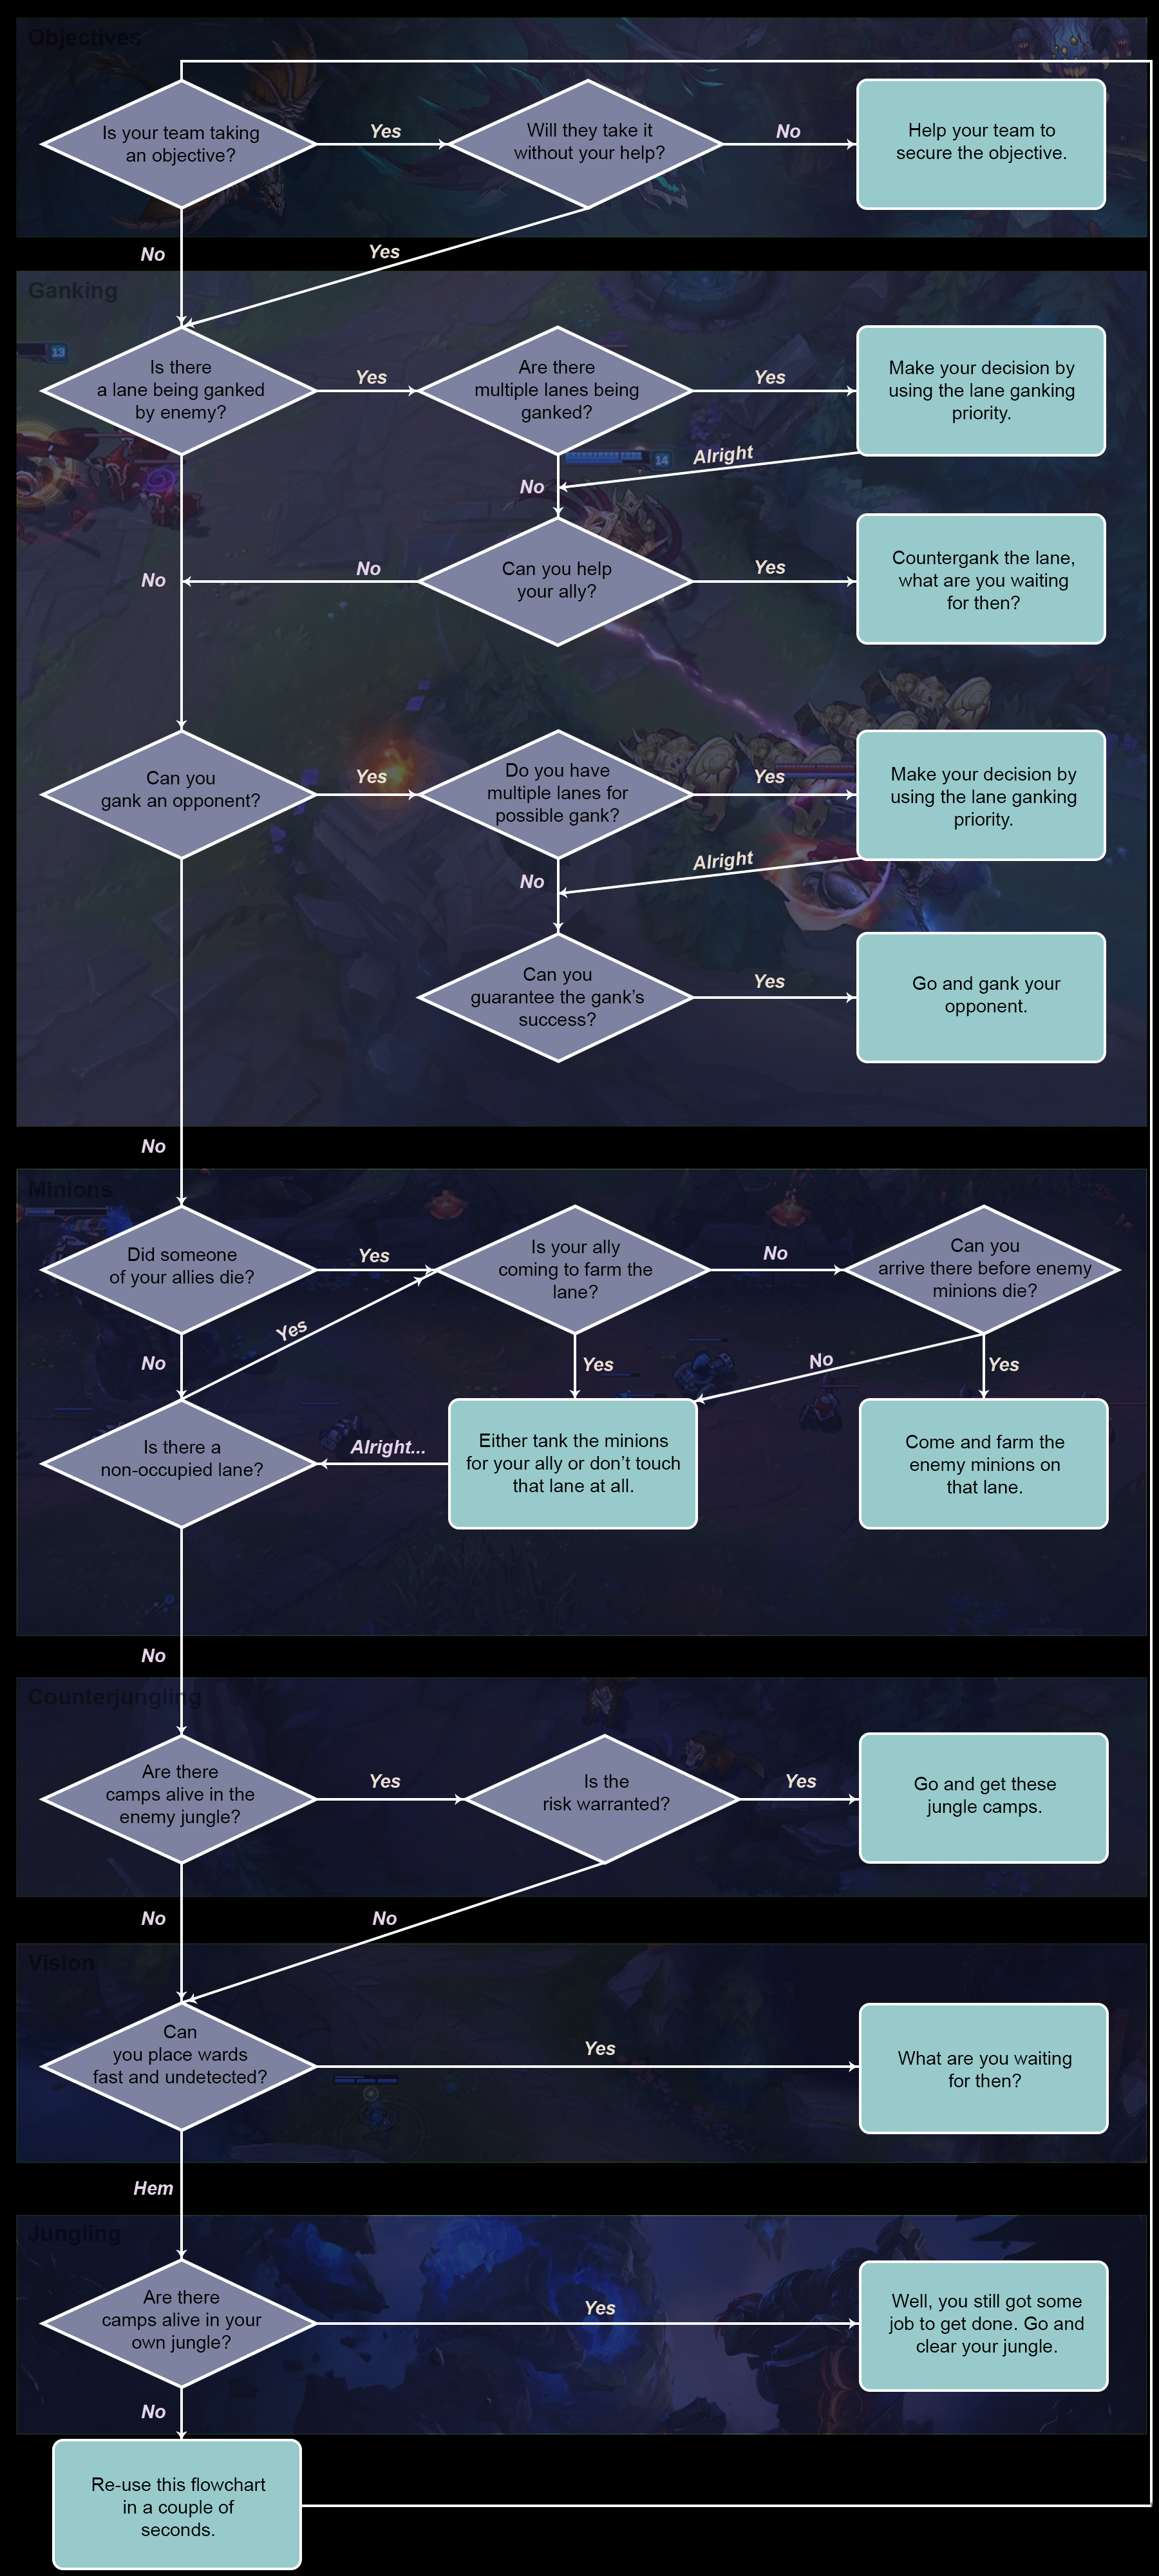
If you understand this flowchart, no clear will be a problem for you after the first one, so the only think you should know is how to do your first clear.
|
First clear routes
|
After patch 8.10 things became rough for
Lee Sin, as he relied on quick level 3 route and now he has to delay the ganks as early ganking will put him behind in most cases, yet there is a way to get through it. Use these two clear patterns:1. Buff (any) -> Rift Scuttler -> Gank mid -> Rift Scuttler -> Buff (take yours or invade your enemy's)
Use this route if you are sure you can get a scuttler. If not, use route #2.
2. Red Buff -> 2 small murk wolves -> Blue Buff -> Gromp -> Gank top or mid.
This way, Lee Sin will end up being at least level 3 and you can continue your game by the flowchart above.
Laning
Sad-lee, Lee is currently not viable for laning. :(
Sorry folks.
Change Log
[8.15]:
- Updated the guide's contents to reflect the current patch.
[8.14]:
- A MAJOR update to the guide, now done!
[7.22]:
- The Preseason is here! Removed Runes and Masteries sections and added sections for new Runes Reforged. I hope you will enjoy these detailed descriptions as much as I do! :)
- Reworked Pros & Cons section.
[7.11e2]:
- Improved Items and Combos sections.
[7.11e1]:
- Added a couple of skill orders to choose from for more clarity.
- Clarified item builds and added a core item order (to display in front of the guide).
- Changed default skill order in the guide's header to AD Bruiser Lee Sin as it is the most popular way to level abilities on him.
- Properly aligned all 3 mastery tree columns so it will be easier to click on spoilers to reveal details of each comparison. All comparisons are accurately in line with one another now.
- Detalized Fury vs Sorcery in mastery choices.
- Bandit description fixed: it really does not proc off abilities, sorry.
- Corrected and detalized my description on Battering Blows vs Piercing Thoughts.
- Added a remark below the analysis of masteries which adds more clarity on correct mastery choices.
- All runes are now divided by 3 categories: the good, the bad and the doubtful.
- Reworked the description of marks for more clarity on the choice.
- Reworked the description of seals for more clarity on the choice.
- Added more choices to glyphs to discover: energy and scaling energy.
- Reworked the description of quintessences as it was pretty non-informative.
- Added more choices to quintessence analysis: energy and energy regeneration.
- Added a Smite synergy with Iron Will to Abilities section.
- Made Dragon's Rage tips and tricks much clearer than before.
- Added more clarity to Hunter's Talisman and Corrupting Potion.
[7.11]:
- Initial release!
Videos



You must be logged in to comment. Please login or register.